
Text to column in Excel
Text to column method separates a single column data into multiple columns so that it becomes easily readable. For example, a column is containing first name, last name and profession in a single column. So, this feature will help the users to separate these values in different columns.
The main purpose of using this method is – each column must have atomic values. If a single column contains multiple values separated by delimiter in its cells, this method will help you. Using this method, you can separate the multiple values stored in a single cell.
This chapter will help you to split the cell data into multiple columns. Excel users can split the data on the basis of delimiters, such as – Comma, Semicolon, Space, or other characters. Text to column is an amazing feature to use.
When to use text to column option
Text to column is a very useful and interesting feature of Excel. You can use it to split the cell data into multiple columns. Excel users require this function in the following scenario. For example,
A column contains the first name and last name in a single cell. Later you need to split these first names and last names into separate columns. Thus, it becomes more readable. It is essential when you require to transform the Excel data to another file format, such as – CSV file.
This process is also called as delimiting process.
Where does this feature find?
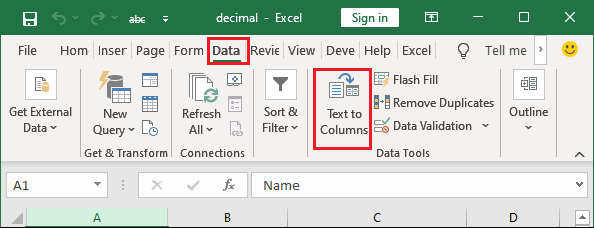
Excel offers the text to column feature inside the Data tab, from where you can use it to separate the data. In MS Excel, there are two features for text to column –
- Delimited – By using this feature, you can split the data that is joined together using comma, semicolon, or whitespace. Additionally, you can also specify any other character to split the data.
- Fixed Width – This feature separates the text that is being joined with space along with some certain width. It splits the text based on some specific character count. For example, it might split at 5th, 15th, or 7th characters.
Fixed width does not offer to select any specific character to split the data. Instead of this, it takes space by default as a separation character.
You can use any of them feature according to your requirement. Both are used in different scenarios, and they are totally different to each other and cannot fulfil the requirement of one another. So, wisely choose the splitting method.
Examples
We will discuss various examples in this chapter by which we will try to show the use of both delimiters division and fixed width.
Example 1: Split the text using delimited
Example 2: Split the text using fixed width
Example 3: Split the text based on different delimiters
Example 4: Extract the four characters from the text
Example 5: Extract the domain name from email address
These examples will help you learn the Excel text to column feature that extracts the text or separate the data into multiple columns.
Example 1: Split the text using delimited
We have a set of data that is stored in a single column cells. Here, first name and last name is stored in a single column.

Some names are only first name without last name. Now, we want to split this data into a separate column. For this example, we will use the delimited feature of text to column to split the data.
For this, follow the given steps below:
Step 1: Firstly, insert a new column between columns A and B because there is no blank column just immediate right to column A.
To insert the column, go to column B and right-click on it. Then choose Insert from it.

Tip: If you do not insert a new column, currently existing column B (Email column) will be overridden.
Step 2: Name the inserted column as Last name and then select the column/cell whose data you want to split.

Step 3: Go to the Data tab and click the Text to Column option that will open a wizard.
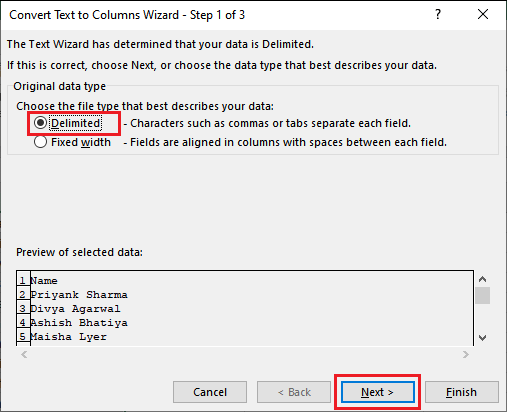
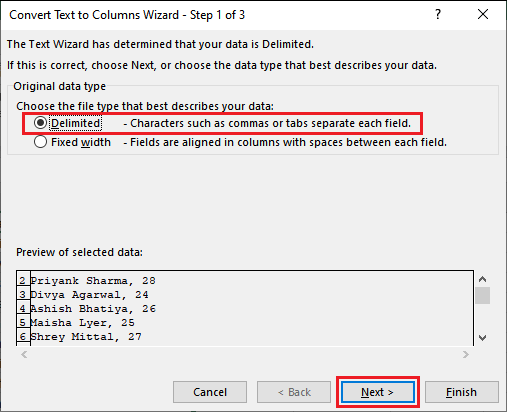
Step 4: On this wizard, select the Delimited radio button this time and click Next.
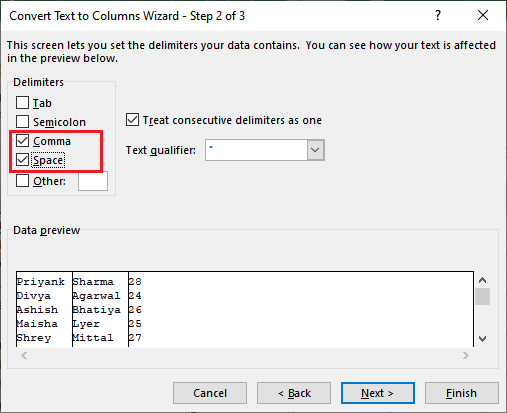
Step 5: Now, select the delimiters (like comma, whitespace, or semicolon) on this basis of which you want to split the cells data.
So, mark the Space checkbox and unmark others here as we are splitting the text based on text.

Step 6: You can also preview the data that how it will look after split in the Data Preview section. If everything is fine, click Next.

Step 7: Here, keep the default selected value and click the Finish button.
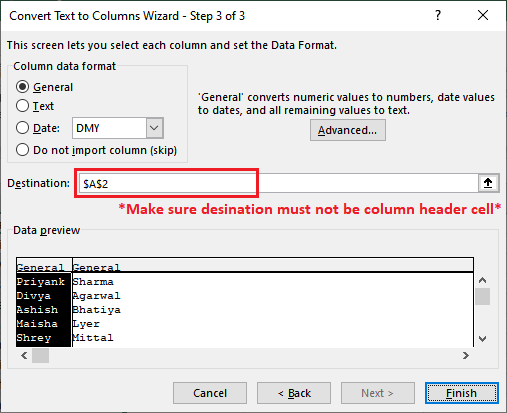
Just make sure that the destination field reference should not have the column header.
Step 8: See that names have been separated as first name and last name.

Example 2: Split the data using fixed width
We have the same set of data used in the first example containing the first name and last name in a single column cell. Now, we want to split this data into separate columns. This time, we will use the fixed-width feature instead of delimited to split the data.
Follow the given steps to split the text to column:
Step 1: Select the column/cell whose data you want to split. Before this, insert a column between columns A and B.
Step 2: Go to the Data tab and click the Text to Column option that will open a wizard.
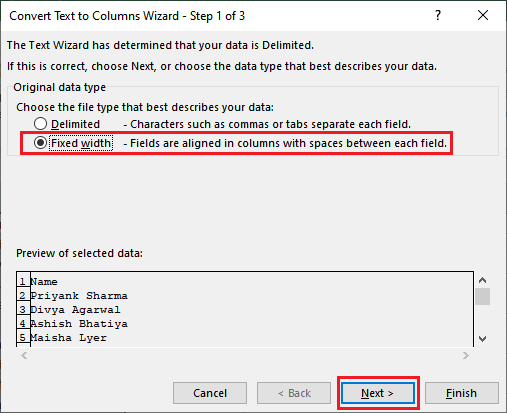
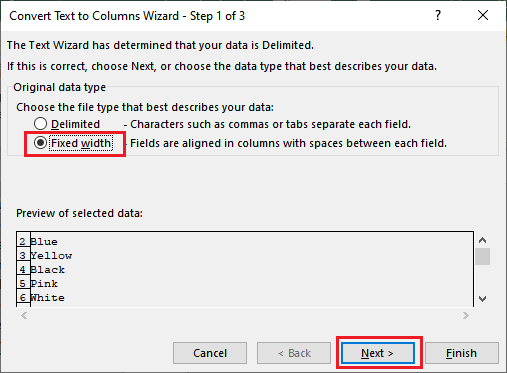
Step 3: On this wizard, select the Fixed width radio button this time and click Next.
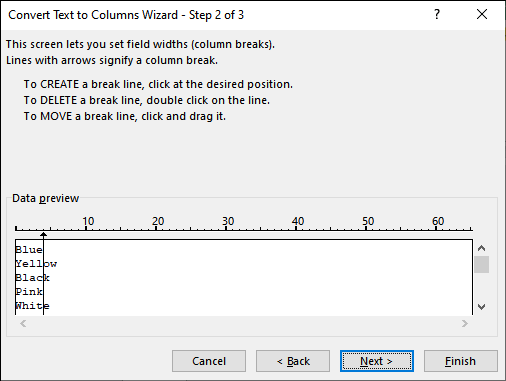
Step 4: Set the desired positions from where you want to split the text of column.
Click the meter line and insert the vertical arrow. You can then move it to the position where you want the text to be divided. After setting all splitting positions, click Next.

You can set one or more positions as we have set two. However, you can set more separators by just clicking on this number line.
Step 5: Now, you can see the data preview and how it will look after split in the Data Preview section. If it looks fine as you want, click the Finish button.

Step 6: See that the selected column text has been separated into three columns but not like what we wanted.

You can also notice that email column data has been replaced with split data (third part of split data) because we had inserted only one column but divided in three parts.
Conclusion
It is not looking useful here and does not fit in this scenario. But it can be useful in other cases where a user requires this type of separation. It will help you out there where delimiters would not work.
Example 3: Split the data based on different parameter
We will take one more example in which we will split the text based on different parameters. We will use multiple delimiters here to split the data into multiple columns. With the help of this example, we will learn how the users can use multiple delimiters together to split the data.
Especially for this example, we have prepared the following data where column A contains multiple data separated by comma and whitespace.

Look – this time, we do not have any data in the nearest column. So, we do not need to insert a new column.
Steps to split text into columns using delimiters
Look at the steps and follow them while splitting your data using the delimited method:
Step 1: Select the data of the targeted column whose data you would like to split into multiple columns.

Step 2: Now, go to the Data tab and click the Text to Column option that will open a wizard.
Step 3: On this wizard, select the Delimited radio button this time and click Next.
The next step is to select the delimiters (comma and whitespace) on this basis, of which you want to split the cells data.
Step 4: Mark the Space and Comma checkboxes and unmark others so that it will split the text from where it found either space or comma.
Step 5: Inside the Data Preview section, you can preview the separated data how it will look in columns after split. If everything is fine, click Next.

Step 6: We found data separated as we wanted. Now, keep the default values on this panel and click the Finish button.

Step 7: See that text has been divided into three columns. But you will see that the row that does not contain the last name and number is placed in that column.

Example 4: Extract four characters from the text
Sometimes, we require a fixed number of characters separation or you can say that extraction from the text and store it in another column, the fixed-width feature of text to column will help us. By setting the fixed-width as a separated parameter, we can split the text wherever we want.
We have the designed following set of data for this example. We will extract the first four characters from each cell data of column A using the “fixed width” feature.

Look at the steps below –
Step 1: Select the cell A2 to A9 that contains the text data (Color Name).

We will extract the four characters or place the remaining characters in the immediate next column.
Step 2: Go to the Data tab and click the Text to Column option that will open a wizard.
Step 3: On this wizard, select the Fixed width radio button this time and click Next.
Step 4: Set the desired positions from where you want to split the text of column.
Click on the meter line to insert a separator (a vertical arrow) and then place it after four characters.
Additionally, you can set one or more separators to split the text. You can set more separators by just clicking on this number line.
Step 5: When the separator position is set for extraction, see the preview of the data inside the Data Preview section and then click Next.

Step 6: In the end, click the Finish button to keep and save all the operations.

Step 7: Our selected data is separated like that – four characters have been extracted and remained in the same other and the remaining characters are placed into a new column.
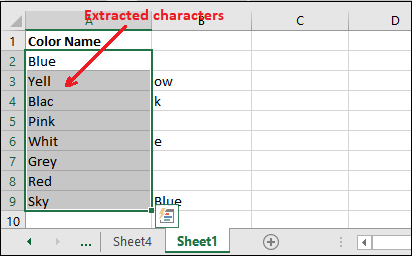
Four characters from each cell of column A has been extracted successfully.
Example 5: Extract the domain from email address
Suppose you have employee data that contains the email address. You have a requirement to extract the domain name from their email addresses for some special need.

Now, we will represent the example to extract the domain name from the email address. In this scenario, delimiter of text to column feature will help. Let’s see how it will be achieved.
Steps to split text into columns using delimiters
Look at the steps and follow them while splitting your data using the delimited method:
Step 1: Before start, provide the column name (Domain Name) to column B, in which we will store the extracted domain name.

Step 2: Now, select the email address column without the header and go to the Data tab where click the Text to Column option.

It will open up a panel where you select the way of extraction.
Step 3: On this panel, select the Delimited radio button this time and click Next.

The next step is to select or define the delimiters (comma and whitespace) on this basis of which you want to split the cells data.
Step 4: Unmark all prechecked checkboxes and mark Others, then enter @ symbol in its corresponding input field and click Next.
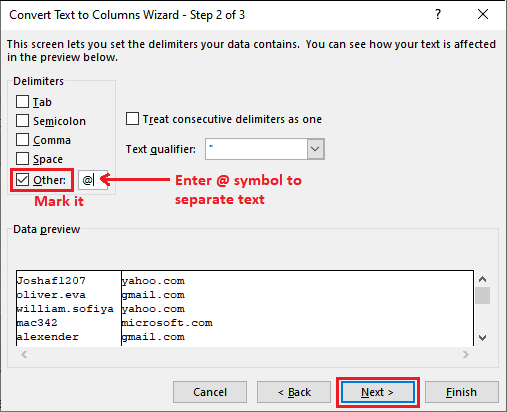
In this way, a user can specify a particular character, special character, text, string, number, or anything he wants to make it as a separator – can do it.
Step 5: Inside the Data Preview section, you can preview the separated data that is split from where it found @symbol in the column text.

Step 6: Now, keep the default values on this panel and click the Finish button.
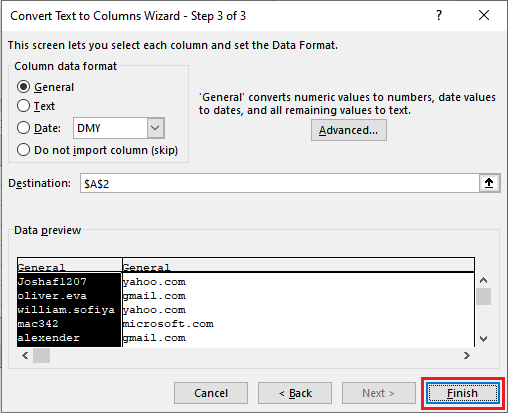
Step 7: Split data is placed in two columns: before @ symbol and after @ symbol (separated as we want).

So, these were several examples. Hope, you have got the use of text to column feature to separate the column data.
Tip: Split the text of the column into multiple columns.


