
Insert object in Excel
MS Excel provides support to OLI and object is a part of it. OLI refers to the Object Linking and Embedding that is used to include content from other applications, such as Word or PDF documents.
Generally, Excel users insert an image, table, chart, or import data from JSON or CSV files to an Excel sheet. But now you see to insert an object in an Excel sheet. Here, object refers to an external file whose data is inserted into the Excel sheet through Object option.
Excel provides direct access to that source file when you insert the content from another application to an Excel sheet.

By taking the help of this chapter, you will learn to insert an object into an Excel sheet and how it works after inserting. So, now you see to insert an object in Excel to link and embed the source file.
What do you understand by object?
Excel provides an option named Object that is available inside the Insert tab. Basically, this option in MS Excel allows its users to insert the external content to the Excel sheet. This inserted object works as a direct reference to the data source for the dataset in Excel. It means the external file embed to the Excel sheet.
You can understand Embedding as inserting the data from an external program, like Word and PDF to an Excel sheet through an object. It provides direct access to the source files inserted into your worksheet.
We are discussed the following methods to insert an object:
- Need to embed object
- Insert a new object into an Excel sheet
- Insert an existing object into an Excel sheet
- Link an object to an Excel sheet
- Insert a file as a link into an Excel sheet
- Link to object vs Embed to object
- Things to remember while inserting object
Need to embed object
In MS Excel, large calculations are performed on data. Sometimes, the users do not remember the calculation and data when they reuse the file after a long time. Generally, the users use comments or notes along with the data. These comments can be large sometimes. In such cases, Excel users use a Word or Text file for large comments by inserting them as an object instead of writing inside cells.
- Excel users can embed objects (Text files) to Excel sheets to insert large comments or detailed information about some data.
- Users also insert data tables and charts to the sheet. To explain the chart or this data table, you can embed object to the Excel sheet by creating a file within the worksheet.
- By embedding the file from another application program to an Excel sheet keeps the worksheet presentation very clear and the data does not get congested. Only the most required data is directly visible to the user.
- The Excel users can focus only on key information. If the user wants to access the embedded object, double-tap to open this file.
- Embedded file is a better option than link to file option. When you share the worksheet with someone working on a different computer system, embedding an object is the preferable option. Link to file option only works when the source file is saved on the same system. In contrast, the source files are saved within the Excel sheet.
Insert a new object into an Excel sheet
The Insert Object resides inside the Insert tab of the Excel menu bar. From here, you can insert an object and embed/link an external file data to an Excel sheet. Follow the steps to learn the process of inserting a new object to an Excel sheet.
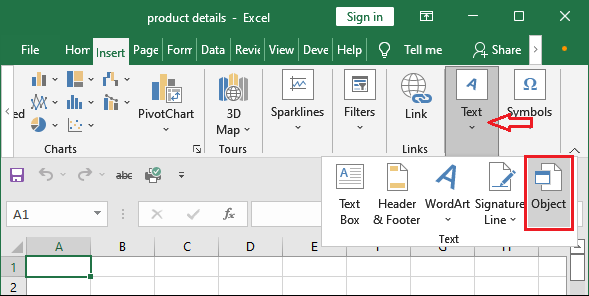
Step 1: Open a new Excel sheet on which navigate to the Insert tab of the Excel bar.

Step 2: Here, select the Text dropdown option and click the Object in the list.

A panel for creating a new object will open. Remember that – only the file type offered inside the Create New tab can be embedded in an Excel sheet.
Step 3: Inside the Create New tab, choose a file type. We have chosen the Microsoft Word Document from the Object Type list.

Step 4: Mark the Display as icon so that only the embed file icon will display instead of entire file. Now, click OK to close it.

“You can also change the icon by clicking the Change icon button.”
Step 5: A new Word document will create automatically. Enter the data here, whatever you want to put and press the Ctrl+S key to save the file.

The Word document is saved as Document in product details. Here, product details is the name of the Excel file for which this document is created.
Step 6: Now, close the embedded Word file and go back to the Excel sheet. You see an icon has been inserted to the Excel file for the created document.

Now, double-tap this icon to directly open the linked/embedded word file to it from here. After that, one can make changes to it. This Word document is not available outside this Excel file. It is only for this Excel file. So, you cannot access this file directly without open the Excel file in which the Word file is embedded.
Insert an existing object into an Excel sheet
In the previous method, we have inserted (embedded) a new object of Word document type into an Excel sheet. This time, we have an existing object created earlier. So, we will insert an existing object to an Excel sheet.
Follow the steps to learn the method to insert an existing object to an Excel sheet.
Step 1: Open a new Excel sheet on which navigate to the Insert tab of the Excel bar.
Step 2: Here, select the Text dropdown option and click the Object in the list.
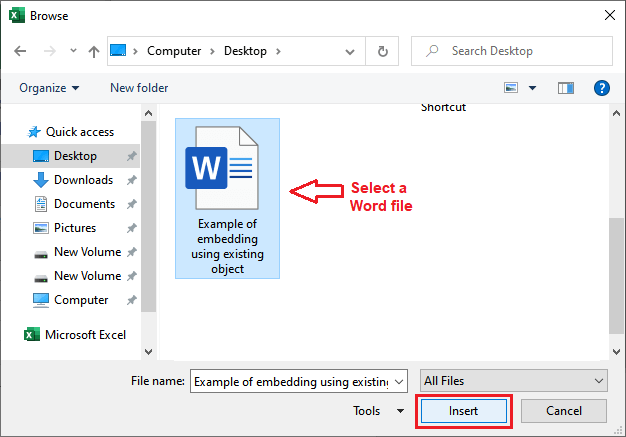
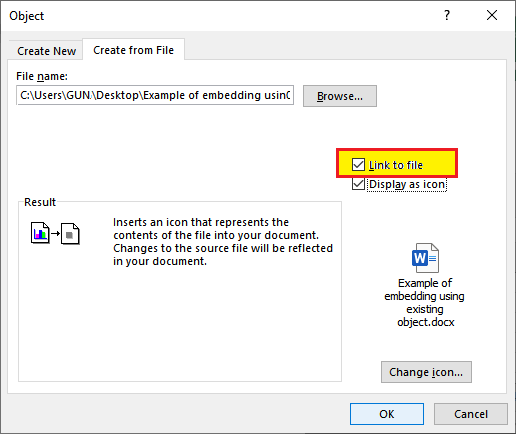
Step 3: This time, switch to the Create From File tab and click the Browse button on it to insert an existing file to the sheet.

Note: Remember only the file type you have selected in Object type can be embedded.
Step 4: Browse a Microsoft Word file in your local storage and select it, then click Insert.
Insert as an icon
Step 5: The selected file link has been inserted. Now, mark the Display as icon and click OK to close the panel.

Step 6: Your selected file has been embedded to the Excel file that is displaying as an icon right now.

Step 7: To see the content of the embedded file, double-tap on the icon to open it. The embedded document will open and show you as like below.

When you insert a document using object, Excel provides direct access to that file. You can open the file directly from the Excel sheet and even edit the content inside that source file (embedded file).
What if not mark Display as icon?
If you do not mark the Display as icon field, the entire content of the selected file will be inserted to the Excel sheet. You can see the entire data of the inserted file is showing instead of icon.

If you tap on the inserted content of the file, the embedded document will open within the Excel file. It will show as like below:

You can modify the embedded document even after inserting it to the Excel sheet. The document cannot be PDF type which is uneditable. Apart from the Word file, you can insert PDF, PPT, or another Excel file.
You have seen that we have inserted the file displaying as an icon. The users can also embed a file as a link to the Excel sheet. The embedded file must remain on your system.
Link an object to an Excel sheet
Embedding the Excel sheet keeps the inserted document separate. Changes in the source file do not reflect inside the embedded object in the Excel sheet. If you want to reflect the source file changes inside the object inserted into the Excel sheet, use the Link to file option.
Note that link to file requires the inserted document at the same place. It means the inserted document should not be deleted or changed location. Steps are almost the same for linking the file to an Excel sheet with one extra step.
See the steps to learn to link the file to an Excel sheet:
Step 1: Open a new Excel sheet on which navigate to the Insert tab of the Excel bar.
Step 2: Here, select the Text dropdown option and click the Object in the list.
Step 3: This time, switch to the Create From File tab and click the Browse button on it to insert an existing file to the sheet.
Step 5: Now, mark the Display as icon to display the file as an icon and Link to file checkbox to link the file with Excel. Click OK to close the panel.

Step 6: Your select file has been embedded to the Excel file that is displaying as an icon right now.

Now, if any changes are made in the source file (linked document) they will reflect in the document inserted inside the Excel sheet as it is linked rather than embedded.
Insert a file as a link to Excel sheet
In previous methods, you have learned to embed the other applications data into an Excel sheet. The embedded files are displayed as an icon on the Excel sheet. By hitting the icon, you can access the embedded file. Besides this, we have also shown a demo of inserting the entire content instead of the source file icon.
Now, we will embed the data of other applications as a link. Follow the steps to insert the data of another application as a link of the file.
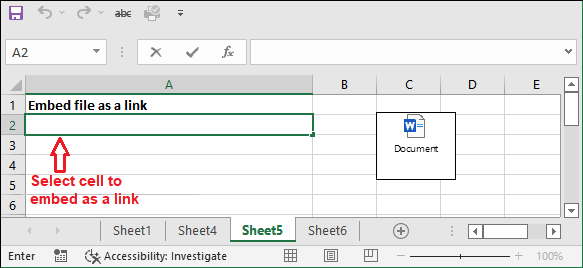
Step 1: In an Excel sheet, click inside a cell in which you want to embed a file data as a link.
Step 2: Switch to the Insert tab in the Excel menu bar and click the Link option.
Step 3: A panel will open to choose a file/data. Select a file you want to embed with an Excel sheet and click Insert on this panel.
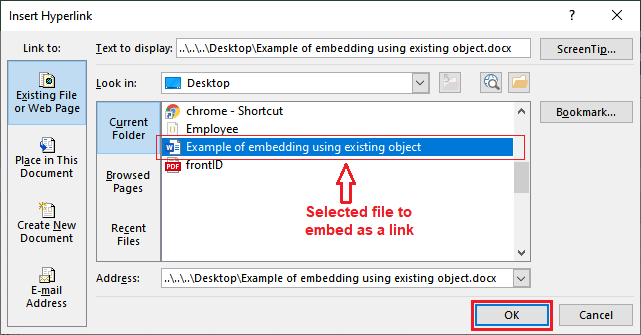
Step 4: Our selected document has been inserted along with its location in the selected cell.
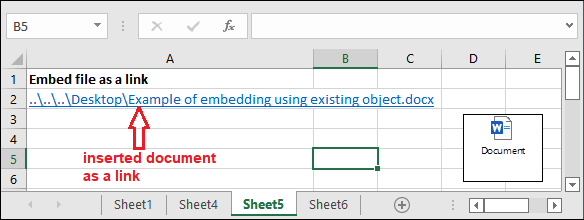
So, the embedded document will open when you tap on this link.
Link to object vs Embed to object
The is a big difference between linking and embedding an object to an Excel sheet. When an object is inserted into the Excel sheet, the inserted object becomes part of the Excel sheet.
If you make any of the changes in the source file, this will not impact the embedded file in Excel. This is because the file is only embedded to the Excel sheet, but it is not linked yet. So, the changes in source file do not reflect in Excel embedded document. It means the embedded document is separate from Excel.
The Excel user has to mark the “Link to file” while inserting an object in Excel to link the object to Excel sheet. Now, the source file changes will reflect in the object inside the Excel sheet.
Remember that the linked file must not be deleted and will be on the same location from where you have inserted it to the Excel sheet as an object. Otherwise, link to file will not work. You can edit the linked file either from Excel by double-tapping on it or from its original location.
If the Excel users share the worksheet having objects (other application data inserted to a sheet), Embed an object is preferable over the link to file.
Link to file requires the source file to be stored on the same system. On the other hand, the source file resides within the Excel sheet when you embed an object.
Things to remember while inserting object
- The users can embed only those file types given inside the Object Type in MS Excel, i.e., Insert > Object > Create New > Object Type.
- While inserting an object into an Excel sheet, mark the Display as icon checkbox so that the insert document display as an icon rather than the entire content. Hence, it does not take too much space of the sheet.
- If you print the Excel sheet containing embedded/linked objects inside the sheet and the object is inserted as an icon, the content of the embedded document will not print. The icon that is displayed will print as it is.
- Make all the changes before embedding the document in an Excel sheet. But if you are using Link to file option, only then the changes in source file will reflect in the embedded object even after embedding.
- While sharing the file with other users, the recipient users system must have the required software installed on their system that supports to read and edit the embedded file.
- Embedding an object make the Excel file heavy and increases the file size. If you do not want to make the Excel file heavy, you can use Link to file option.


