
How to lock cells in Excel?
Locking the cells means restricting the cells from being edited. When you lock the cells in Excel, no one can make any changes in them. The user cannot make changes in formula as well as in content of the protected cell.
Note: Lock function works with Protect cell function. Both functions together make complete sense.
In Excel, you can lock the cells to make them uneditable. It saves your data from unwanted changes in the Excel sheet. You can lock an individual cell, range of cells, or even all cells in an Excel worksheet. By default, all cells are locked in Excel, you just need to protect them to completely lock them.
This chapter will describe you each step to lock cells. But remember that only locking the cells do not work until you protect these cells.
Why locks the cells?
In this chapter, we have specified two most common but essential reasons to lock the cells or the entire worksheet.
Cause 1
Often, when you are working with an Excel worksheet and you accidently press the DELETE, BACKSPACE, or any alphabet or number key, either your data is lost or edited wrongly. If you spot the error, then fine, you can correct it; otherwise, you can get an erroneous result.
Cause 2
Another reason to lock the cells may be that you would not like that anyone can edit your excel worksheet without your permission. Hence, you can lock the cells so that the user can only open and read your worksheet but cannot edit it.
Solution
Excel provides a way to protect your data from this happening. You can lock the cells and protect them from being edited and save the file from unwanted changes. You can also customize the protecting of worksheet. It means that you can also allow the users to perform some of the operations on the worksheet even when it is locked/protected.
What operations need to lock the cells?
To protect your Excel worksheet from unwanted changes, you must perform the following operations on your worksheet one after another.
- Lock the cells
- Protect the cells
The sequence of operations is important. We will describe both methods in detail by taking a proper example. Firstly, we will instruct you to lock the all cells of an Excel sheet and then a few specific cells as well.
Lock all cells
Previously, we told you that all cells are locked by default. Before moving to the next step to protect the cells, verify once that the cells are actually locked or not. If the cells are not locked, you have to lock them first.
Firstly, we will verify that all cells are locked initially. For this, follow the steps below:
Step 1: Select all cells of the Excel worksheet using the Ctrl+A shortcut key.

Step 2: Now. Right-click on any of these selected cells and then choose Format cell from the opened list.

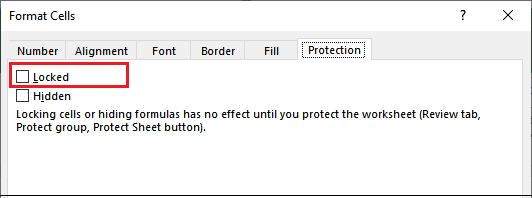
Step 3: A format cell panel will open where go to the Protection tab and verify that all cells are already locked currently.
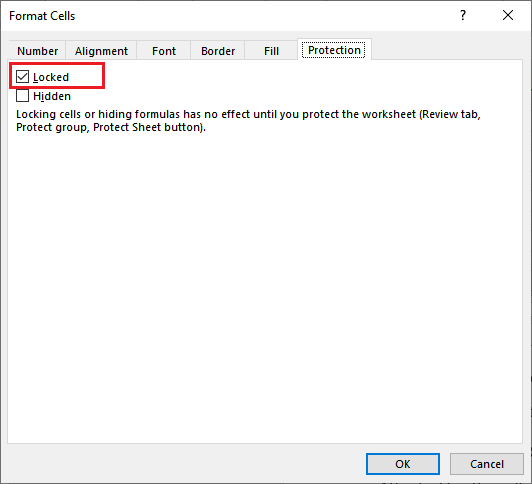
Press the Ctrl+1 shortcut key to directly open the Format cells panel.
Step 4: If the locked cell checkbox is not marked, it means cells are not locked. Hence, lock the cells by marking this checkbox.

Step 5: At the end, click the OK button and complete the cell locking process.

Now, move to protect your cell content and applied formulas to it.
Protect all cells
After locking the cell, you have to follow one more step to achieve your goal. Protecting the cells step is as much important as locking the cells. Both steps are equally important. If the cells are not locked, then this will not work and the cell’s content will remain editable. Hence, do not forget to lock the cells.
Protect the cell content by following below steps:
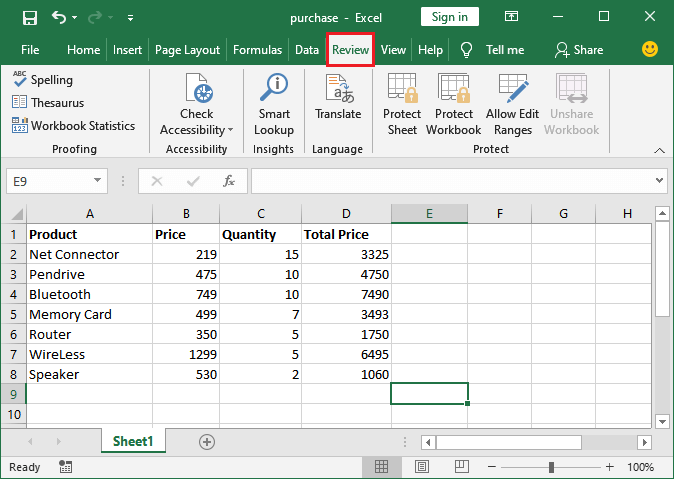
Step 1: On the same worksheet, go to the Review tab in the Excel ribbon.
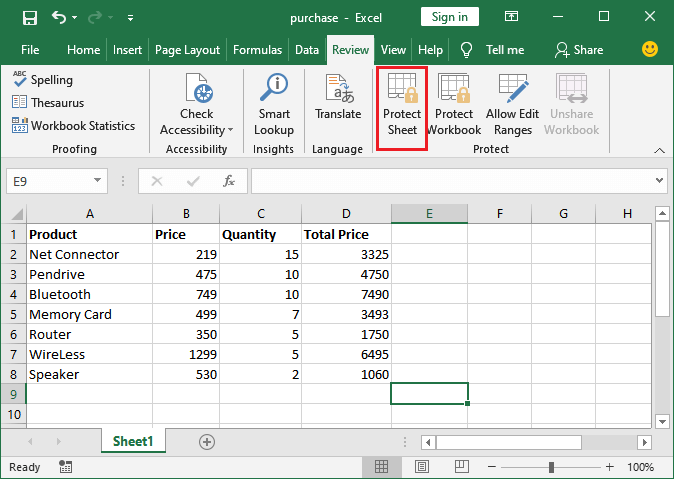
Step 2: In the Review tab, click on the Protect Sheet option under the Protect group.
Step 3: A protect cell window panel will open where you can customize the cell restriction if you want to give some permissions to the users even when cells are locked.
Mark the checkboxes here to give respective operations permission.
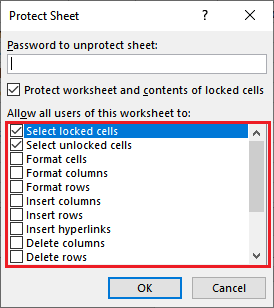
By default, the top 2 options are marked in this list.
Step 4: You can either set a password or directly protect the cells without setting a password and click on OK. For the fully protected cells, make the worksheet password protected.

This password is required when unprotecting the Excel cells. In addition, you can also protect the cells without setting the password.
Step 5: Check that all cells are locked successfully and un-editable now. Once the cells are locked and protected, you will not allow to make any changes without unprotecting them.
Step 6: You will get a warning message, as shown below if you try to edit the locked-protected cells.

Lock specific cells of Excel worksheet
Sometimes, we do not want to lock all cells of an Excel worksheet, but only two or three cells. In this scenario, you have to only lock and protect some specific cells and leave the rest as it is.
Excel allows locking only some specific cells as well. So, making the entire sheet un-editable, it allows you to lock only those cells whose data/content we would not like to be changed. Hence, we will now lock only a few cells and protect them from unwanted changes.
Things to remember before locking few cells
As you know, all cells in an Excel worksheet are locked by default. Therefore, before starting and proceeding forward, make sure that only the cells you want to protect are locked and the rest are unlocked.
Before moving to the next step, keep locked the cells you want to protect and unlock others. If you try to protect the worksheet with all locked cells, all cells will get locked.
Let’s begin with an example –
Steps to lock specific cells
Follow the below steps carefully to lock few cells of an Excel worksheet:
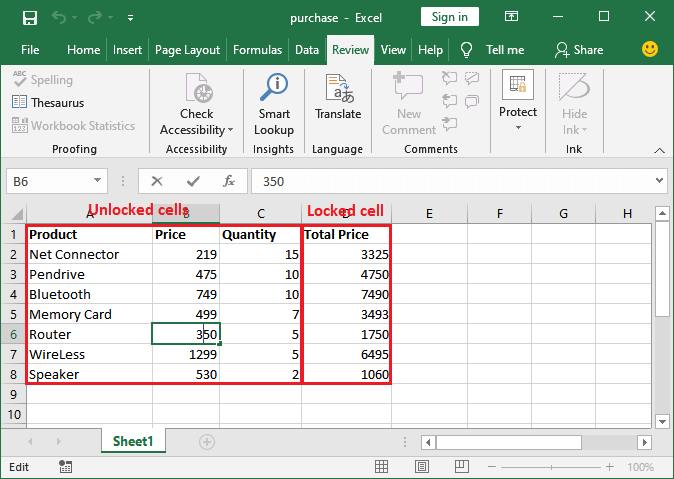
Step 1: Select the cells or a range of cells (A to C column cells) which you don’t want to be locked. Means that – this time, you have to select those cells whose content you allow to be changed.
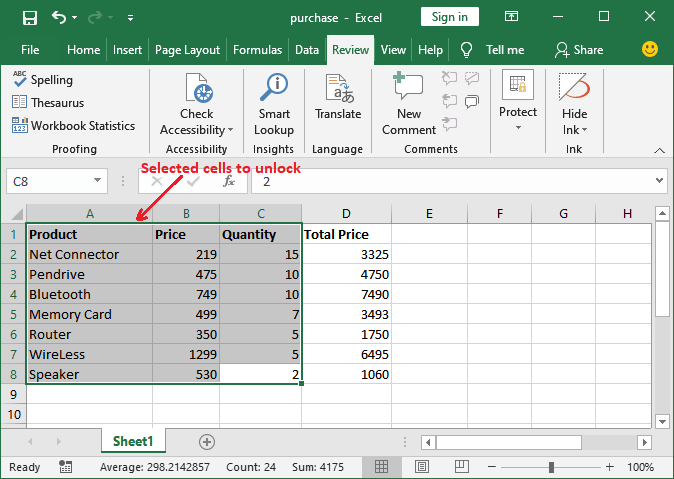
Step 2: Right-click on the selected cell and choose the Format Cells option from the list that will open a format cells panel.
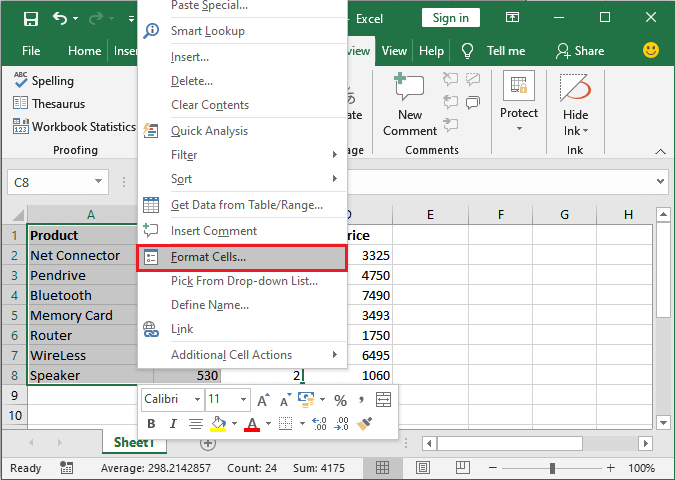
Step 3: In the format cells window, go to the Protection tab and unmark the Locked checkbox to make the selected cells unlocked, and click the OK button.

Now, only the cells you want to protect are locked and the remaining are unlocked. So, when you follow the process to protect the cell, it will work only on locked cells rather than the entire worksheet.
Step 4: On the same worksheet, go to the Review tab in the Excel ribbon.

Step 5: In the Review tab, click on the Protect Sheet option under the Protect group.

Step 6: A Protect Sheet window panel where mark the checkboxes to give the respective operations permission.

Step 7: This time, enter a password that you want to set and click the OK button. This password is needed when unprotecting the cell to make it editable again.

Although you can also protect the cell without setting the password, which does not ask for any password while unprotecting the cells again and directly unprotect the file with a single click.
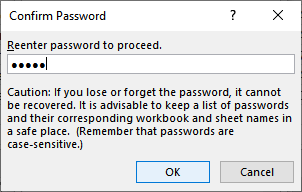
Step 8: It will ask to re-enter the password to confirm and match with the first password you have entered. Enter the password again and click the OK button.
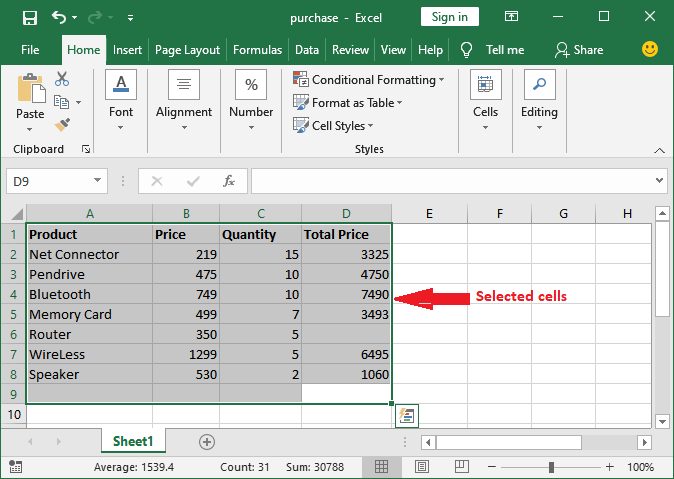
Step 9: Locked cells are now protected successfully. Hence, unlocked cells are still editable, whereas locked cells are not.
You can check that if you click on any cell in A, B, or C column, they are editable. But in column D, cells are not editable. See the screenshot below:
Step 10: On the other hand, if you try to edit any cell of column D, it will show you a warning message, as showing in the below screenshot.

The conclusion is that your chosen cells have been locked successfully. No one can edit the locked cells now without unprotecting them with your set password.
Mixed Lock State
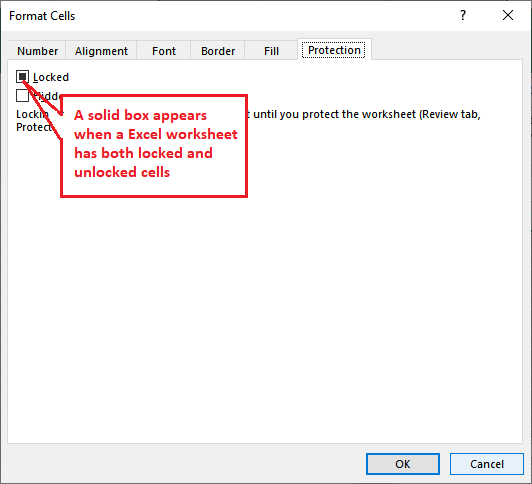
An Excel spreadsheet can have both locked and unlocked cells. When you protect few cells instead of all, then only protected cells are locked and others are unlocked. But the question is that how’s you find if a worksheet contains both types of cells.
You can find if a worksheet contains both locked and unlocked cells. Excel shows it with a solid square box. See the below steps to know the mixed lock state.
Step 1: Select all cells or range of cells of a worksheet and press the Ctrl+1 shortcut key.
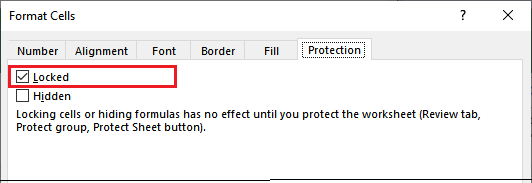
Step 2: A format cell panel will open where under the protection tab; you will see that if the Locked checkbox contains a solid square box which indicates that the worksheet has both locked and unlocked cells.
If the Locked checkbox is marked, it means all selected cells are locked.
The third and last case is – that if the Locked checkbox is not marked and appears blank, it means all selected cells are unlocked.
Similarly, you can check the other worksheets and range of cells. These are the different locking representation states.
Locking state representation
- Locked cells by marked checkbox.
- Unlocked cells by unmarked checkbox.
- Mixed cells by solid square box.


