
How to insert a Watermark in Word
Watermark is a background image that displays behind the text in the Word document. Watermark helps us to identify the manufacturer or brand through which the particular documents relate.
The defaults, Microsoft Watermark are: Confidential (both horizontal and diagonal) Do Not Copy (both Horizontal and Diagonal), Urgent, and ASAP.
There are the following steps to insert a Watermark in Word document –
Step 1: Open or Create a new Word document in which you want to insert a Watermark.
Step 2: Go to the Page Layout tab on the Ribbon and click on the Watermark option in the Page Background section.

Note: To insert Watermark in Word 2013, 2016, 2019, and Office 365, click on the Design tab on the Ribbon and then go to Watermark under the background section.
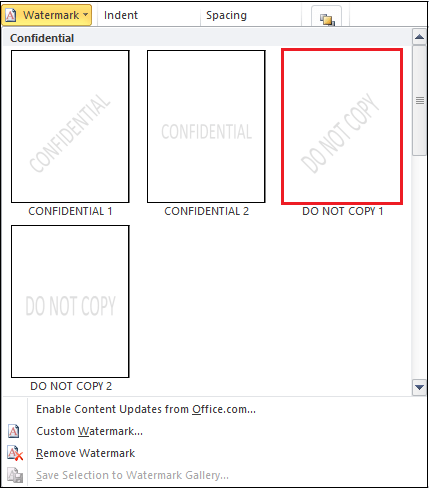
Step 3: The following window will appear on the screen. Select the Watermark that you want to insert in the Word document.
The screenshot below shows that a Watermark is inserted in the Word document.

Custom Watermark
Microsoft Word allows you to create and insert custom watermarks behind the text.
In Microsoft Word, two types of custom watermarks are available –
- Text watermark
- Picture watermark
Insert a Text watermark in Word
To insert a text watermark, follow the below-mentioned steps.
Step 1: Open the Word document.
Step 2: Go the Insert tab on the ribbon and click on the Watermark option in the Page Background section.
Step 3: The following window will appear on the screen. Click on the Custom Watermark option.

Step 4: A Printed watermark dialog box will appear on the screen. Click on the Text watermark radio button and do the following:
Click on the Language: Select the language from the drop-down menu for the Watermark.
Text: Type the text that you want to insert in the document as a watermark.
Font: Click on the drop-down menu associated with the font to select the font that you want to add Watermark.
Size: Select the size for the Watermark.
Color: Select the color of the text that you want to add to the Watermark.
Layout: click on either Diagonal or Horizontal layout for the Watermark.
Once you are done click on the OK button at the bottom of the screen.

The screenshot below shows that a custom Watermark is inserted in the Word document.

Insert a Picture Watermark
Microsoft Word not only allows you to insert Watermark inside the text, but you also insert watermark in the form of an image. An image Watermark can be a logo of a company or a simple attractive image.
You can use below-mentioned steps to insert a picture watermark:
Step 1: Open the Word document.
Step 2: Go to the page layout tab and click on the Watermark option.
Step 3: A window appears on the screen in which click on the Custom Watermark.
Step 4: A Printed Watermark dialog box will appear on the screen. Click on the Picture watermark radio button, click on the Select Picture button to browse the image that you want to insert and click on the OK button at the bottom of the screen.

The screenshot below shows that picture watermarks in inserted in the Word document.

Remove a Watermark
There are the following steps to remove a watermark –
Step 1: Open the Word document.
Step 2: Go to the page layout tab on the ribbon click on the Watermark option in the Paragraph section.
Step 3: The following window will appear on the screen in which click on the Remove Watermark option.

Note: You can also remove Watermark using the Header and Footer option.


