For Each Next Loop
Dim numbcount As Integer
numbcount = 1 + 2 + 3 + 4 + 5 + 6 + 7 + 8 + 9 + 10
This code is used to add the numbers from 1 to 10. The result is then stored in the variable numbcount. Now this looks pretty easy and simple right. But now suppose instead of the first ten number you want to add numbers 1 to 1000, now are you going to write all the numbers and then add them? Of course you can but that would become tedious right. So what do we do? It’s easy actually we use the handy programming tool called “Loop”.
Loop as the names sound is something that goes on and on until you tell it to stop (this is called a “condition”). You set a starting number for your loop, an end condition, and a way to get from the starting number to the end condition. In VBA, there are four types of loop to choose from: For Next loops, For Each Next loop, Do Loops, and While loops. We will focus on the FOR EACH NEXT loop for now.
First let’s look at the syntax of the FOR EACH NEXT LOOP:
For Each item_in_group In group_of_items
'Do something here
Next item_in_group
Explanation: The above loop moves one item at a time starting with the first item in the collection of objects. You can use this particular for loop syntax to iterate along sheets in a workbook or any collection of objects in general.
Here is an example for you to understand the syntax better:
Sub my_for_loop3 ()
For Each sht In ActiveWorkbook.Worksheets
MsgBox sht.Name
Next sht
End Sub
Explanation: This code is used to iterate through all the worksheets in a workbook. In simple words a message box will be displayed with the name of the sheet (you’re working on). After you press ok the name of the second worksheet will be displayed in the message box. The names of all the worksheet opened in your Excel file will be displayed in the message box.
Now let’s see how to use the For Each Next loop. Follow the steps below:
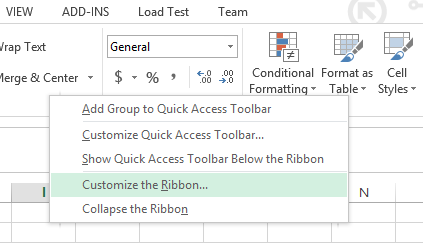
STEP1 Right click anywhere on the ribbon and select “Customize the Ribbon” from the drop down menu.

STEP2 An option dialog box will open. Click on the DEVELOPER check box (it is under “Customize the Ribbon Main Tabs”) and press ok.

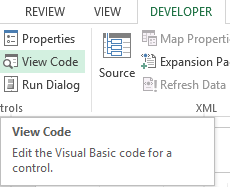
STEP3 The developer tap is now visible and is present next to the view tab on the top menu bar. Click on Developer tab and select “View Code”

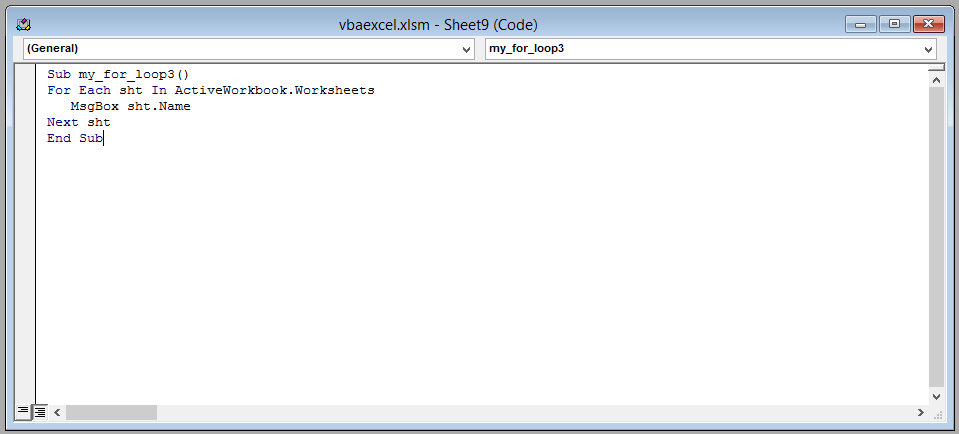
STEP4 A new window (Visual Basic Editor) will open which would have a dialog box in the center. You will write the code in the dialog box.

STEP5 Write the following line of code in the dialog box.
Sub my_for_loop3()
For Each sht In ActiveWorkbook.Worksheets
MsgBox sht.Name
Next sht
End Sub

After writing the code close the window by clicking on the cross(x) icon on the upper right side of the screen. Don’t worry Excel won’t close
STEP6 This is the result. That’s it! You have successfully used a For Next Each loop.


Template
Further reading:
Basic concepts
Getting started with Excel
Cell References


