
Solver in Excel
What is Solver?
Solver is an add-in programming tool supported by MS Excel. It is an optimization tool that uses operational research techniques to determine the optimal solutions and fetch the desired outcomes by altering the assumptions for objective problems. It is a type of the ‘What-if-analysis’ that is useful when the user wants to find out the “best” outcome for a given set of two or more assumptions.
The Excel Solver is essentially used for simulation and optimization of several business and engineering prototypes. It is also useful for solving linear programming models (linear optimization problems), and because of this, it is also known as a linear programming solver. Other than that, Solver is also popular for solving smooth and non-smooth linear problems.
Indeed, Microsoft Solver can’t solve all possible problems, but it is crucially effective when the user deals with all types of optimization problems to make the best decision. For example, you can use MS Solver to maximize the ROD (return of investment), pick an optimal budget for your campaigns, calculate the profit generated by the salesperson and based on that figure out the number of the salesperson to hire, compose an optimal work schedule for your employees, etc.
Add Solver to your Excel worksheet
The Solver add-in is added with all versions of Microsoft Excel though it is not enabled by default. You need to manually add Solver to your Excel worksheet. To incorporate a Solver into your Excel worksheet, follow the below-given steps.
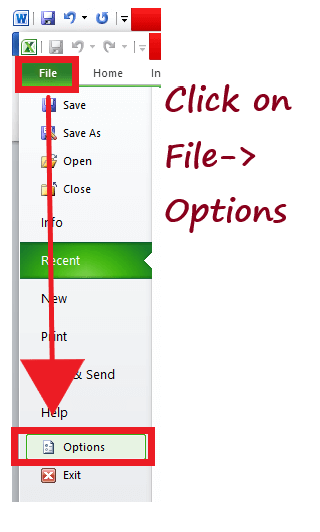
- Open your Excel worksheet, click on Files-> Options.
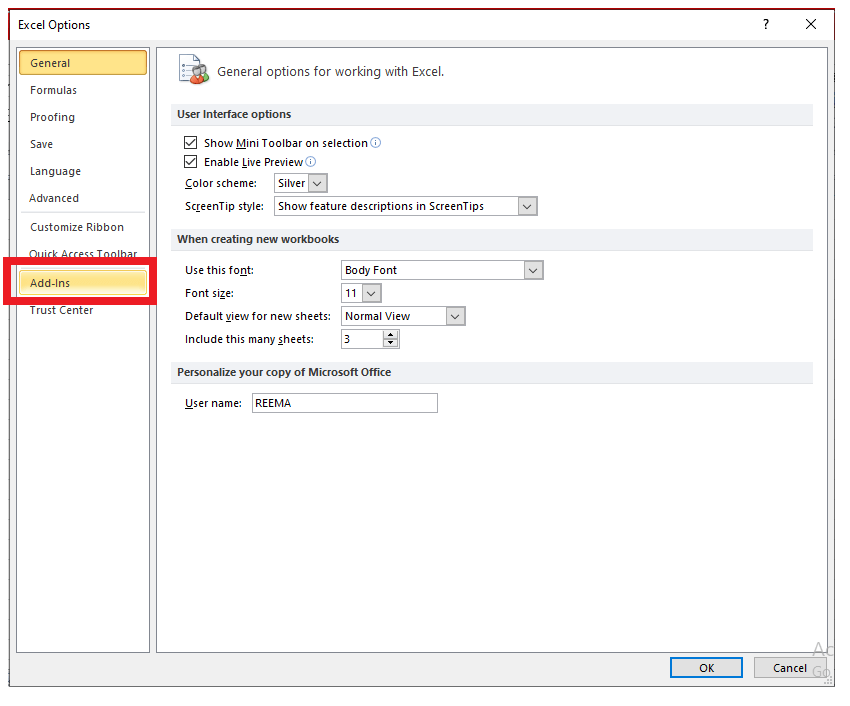
- The MS Excel options dialog box will appear. From the left side of the pane, click on the Add-Ins options.
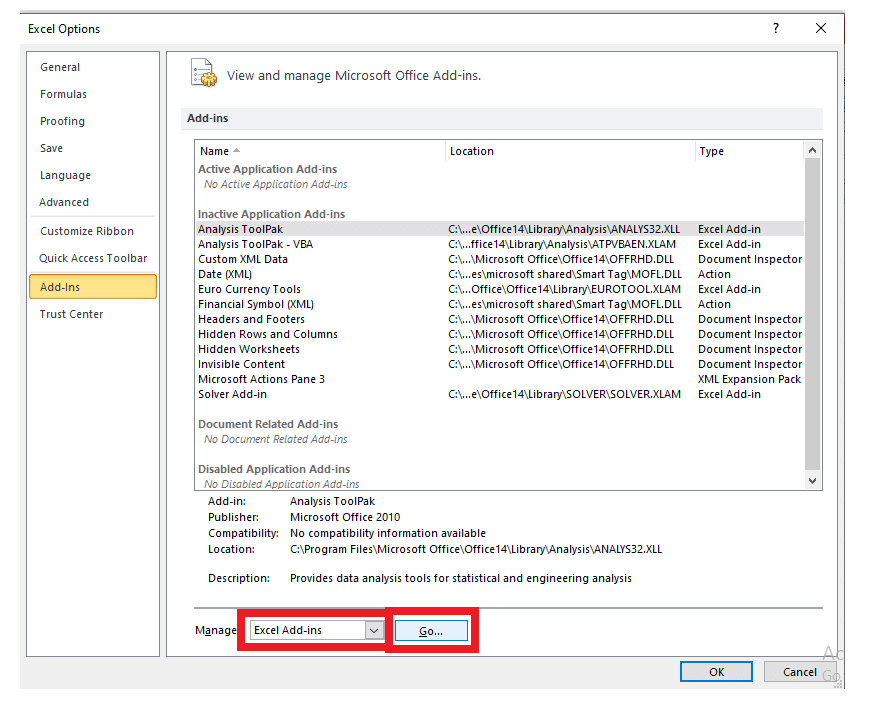
- The Add-Ins screen will be displayed in the center. At the bottom of the screen where the Manage box is located, make sure that the add-ins option is selected in its field. Click on Go.
- The Add-Ins dialog box will appear. Check the Solver ‘Add-in’ box and click on the OK button.
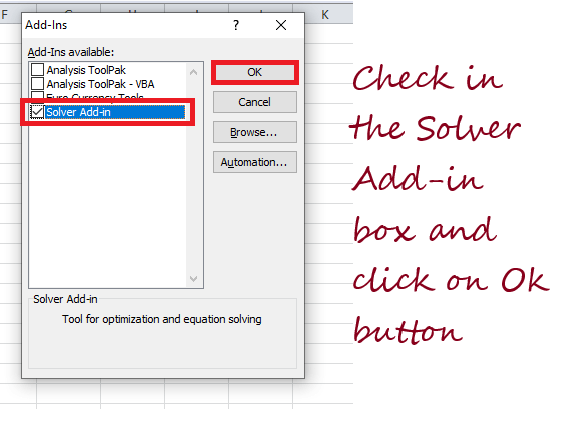
- That’s it; it will add the Solver tool to your Excel Worksheet.
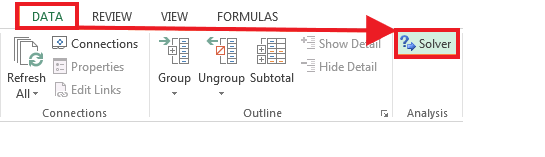
Where is Solver present in Excel?
The Solver add-ins programming tool is located on the Data tab, in the Analysis group.
Steps to use Solver in Excel
Before moving with the steps of the Excel Solver add-in, let’s analyze the problem we will solve using Solver operational research techniques in our Excel worksheet. Below is an easy optimization problem.
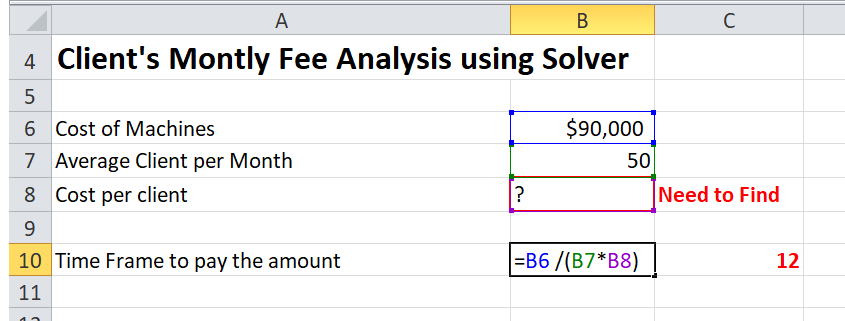
Problem: Let’s suppose you are the owner of a GYM and are planning to expand the services and exercises to attract more customers. For this, you need to purchase various new machines that cost $90,000 and you have to return the amount in installments in a span of 12 months.
Goal: Find out the minimal cost per customer to let you pay the budget for the new machines within the defined time frame.
To simplify the above problem, we have created a model in an Excel worksheet:
Now, let’s solve the above problem in a step-by-step orientation:
Step 1: Run Excel Solver
Click on the Data tab located in the Analysis group. From the given options, click on the Solver button.

Step 2: Define the problem
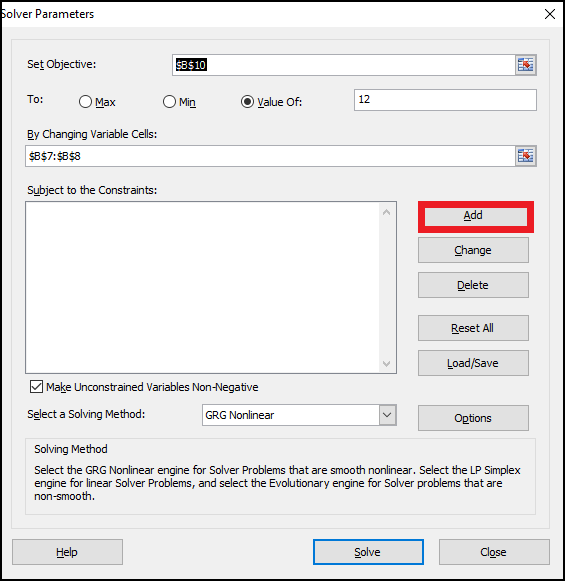
It will open the Solver Parameters window. We need to set up the 3 main Solver components which are as follows:
- Objective cell
- Variable cells
- Constraints
Let’s make it easy for you by explaining how Excel Solver solves any problem using the above parameters? It determines the optimal value (maximum, minimum, or any given value) for the formula we define in the Objective cell by adjusting the values we specify in the Variable cells and obeying the Constraints cells’ limitations.
Let’s briefly understand the 3 solver components:
Objective Cell
The Objective cell, aka Target cell(named in Excel’s earlier versions), contains a formula that describes the objective or goal for a given problem where the objective can be maximized, minimized, or achieved based on some target value.
Let’s understand this using an example,
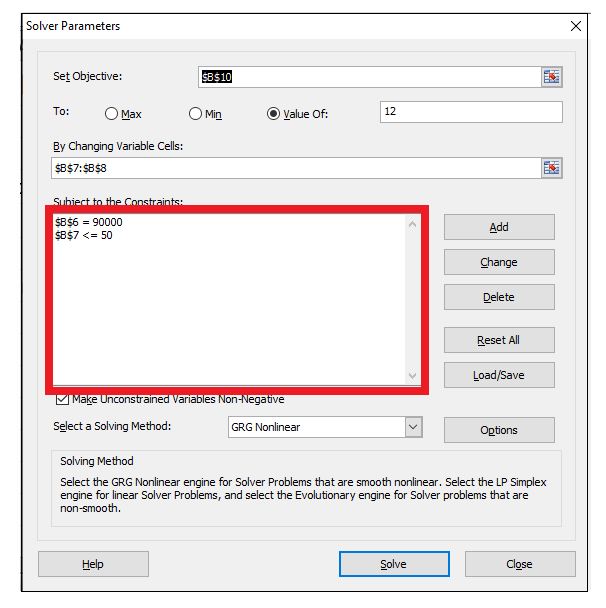
In our case, B10 is our objective cell, which will help us calculate the payment term, where the outcome of the formula, “=B6 / (B7 * B8)”should be equal to 12.
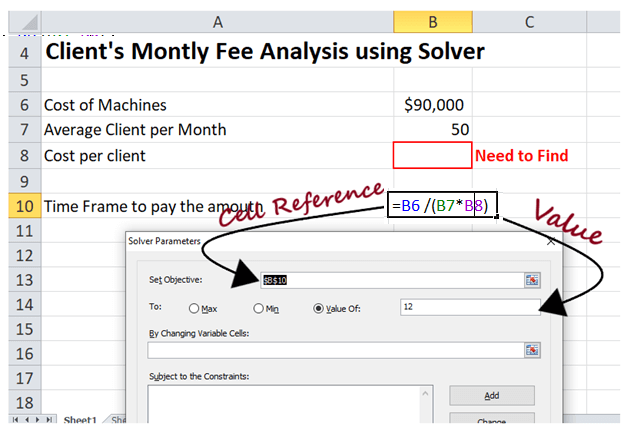
NOTE: Make sure that the objective cell is a formula, else it will throw an error at the time you will solve the problem.
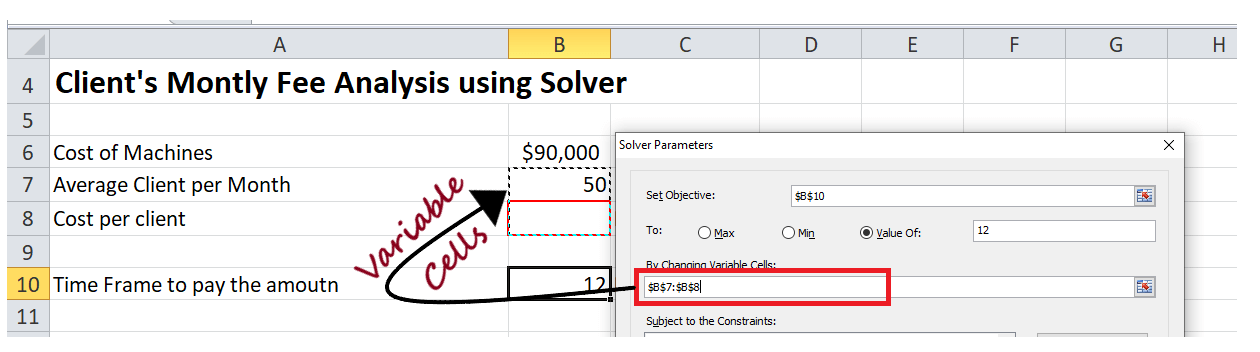
Variable cells
Variable cells, aka Changing cells or Adjustable cells (named in Excel’s earlier versions), hold variable data that can be altered to obtain the optimal objective. Excel Solver supports up to 200 variable cells.
Let’s find the variable cells for this example. Below given are the cells whose values can be altered:
- We can categorize cell B7 as a variable cell as its value can be changed because the projected clients per month that should be less than or equal to 50; and
- Cell B8 can also be categorized as a variable cell as it represents the “Cost per service” that could also be changed.
NOTE: Though in our case the variable cells were adjacent, in case the cells are non-adjacent, select the first variable cell, and then from your keyboard press the Ctrl key and select the non-adjacent variable cell(s). Or another method is to manually enter the cell references, separating them with commas.
Constraints
The Constraints represent the restrictions or limitations of the potential solutions to the problem. In simple words, we can conclude that constraints are the conditions in Excel Solver that must be met.
The Solver tool enables the user to define the constraint by establishing a relationship between the referenced cell and the constraint. You can choose any of the given options to specify the constraint relationships.
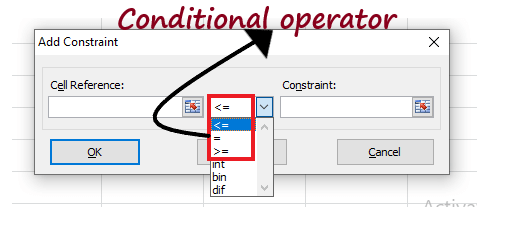
- Comparison Operator: Less than (<), less than equal to (<=), equal to (=), greater than (>), and greater than equal to (>=) are the four primary comparison operators used to set the relationships between constraints. You can select a cell in the Cell Reference After that, choose any of the comparison operator (<=, =,or >=). At last, type your number/ cell reference in the Constraint box.
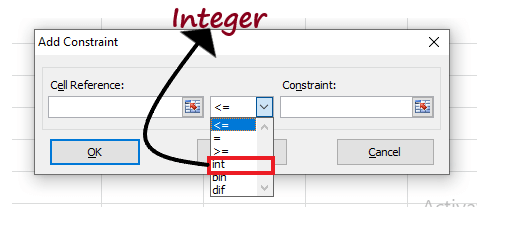
The entered value can be of Integer, Binary, or dif. - Integer: Select int, and you will notice the value in the Constraintbox will change to an integer.
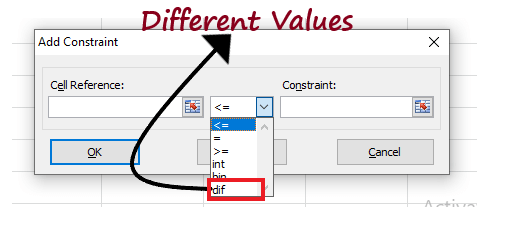
- Different values: You can select dif to enter a different value in the referenced range. You will notice the parameter in the Constraintbox will change to AllDifferent.
- Binary: Binary allows the user to restrain a referenced cell to 0 or 1. To enable binary select bin, you will notice that the Constraint box parameter will change to binary.

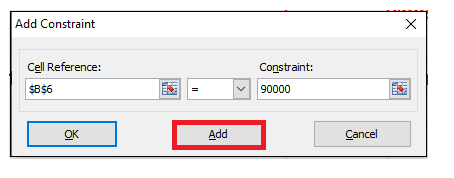
Follow the below-given steps to add a constraint(s) in your Excel worksheet:- Click on the Addbutton located on the right of the “Subject to the Constraints” box.
- The add constraint window will open. Enter the values in therespective Once done click on Add. It will add the constraint in the constraint window.
- To add another Constraintin your model, again click on the Add It will allow you to enter the next constraint in the window. Similarly, enter the other constraints as well.
- Once all the constraints have been entered, click on the OK button. It will take you to the main SolverParameters
- Click on the Addbutton located on the right of the “Subject to the Constraints” box.
In our case, we have entered two constraints which are as follows:
- B6=90000, this constraint value signifies that the expense of buying a new gym machine is equal to $90,000.
- B7<=50, this constraint value signifies that the projected clients per month are under
Step 3: Solve the problem
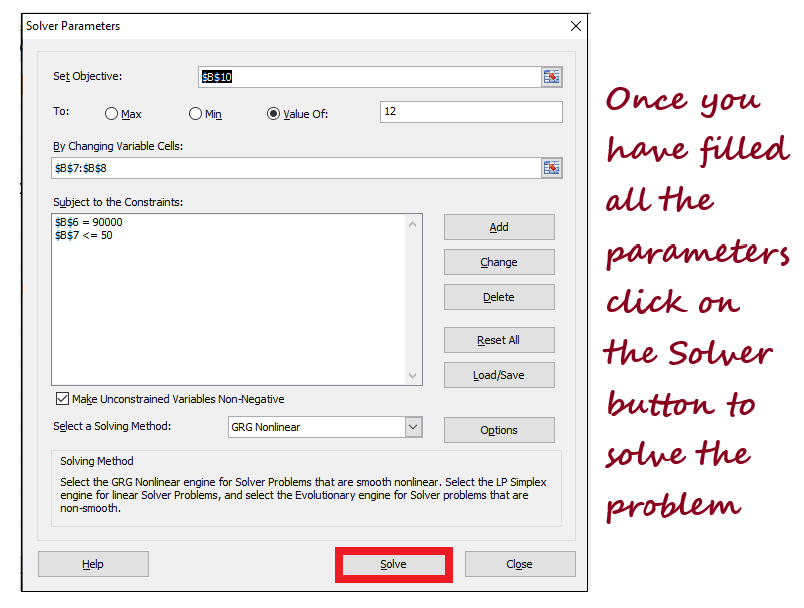
Now, as we have filled all the parameters, it’s time to solve the problem.
- Click on the Solvebutton positioned at the bottom of the Solver Parameters That will enable the Solver tool to look for an optimal solution for the given problem.
- Although it can take some time (from a few minutes to hours) to process the solution depending on the complexity of your problem, system’s memory, or processor speed.
- Once Solver completes the processing, it will present the Solver Output in the dialog window. Select the ‘Keep the Solver Solution’ from the window and click on the OK button.
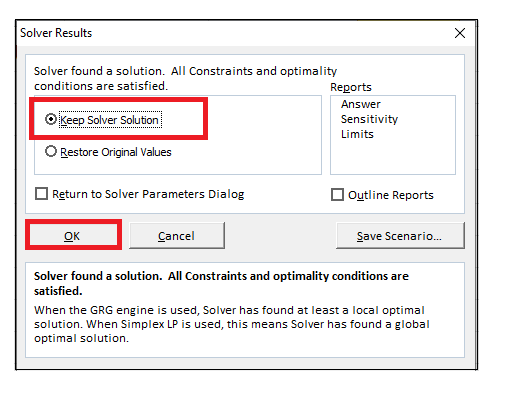
- It will automatically close the Solver Resultdialog window, and the output will immediately appear on your Excel worksheet.
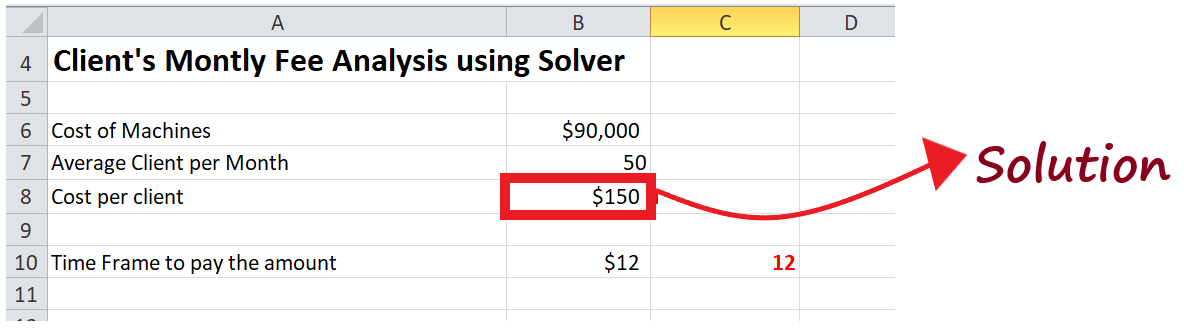
In our case, you will notice the value of cell B8 will change to $ 150. This cost signifies the minimal costs per client that will enable you to pay for the expense of new machines in 12 months, given if at least 50 clients per month.
Important Points
- If your processor is slow or the problem is too complex, or because of any other reason the Solver tool has been processing your problem for too long, you can suspend the process by pressing the Esc key. Excel will stop the process and will calculate the excel worksheet with the last values found for the Variable
- If you want to know more details regarding the solved problem, go to Reportsbox, click a report type and select the OK button. Excel will create the report on a new worksheet.
Save and Load Solver problems in Excel
Once solving a particular problem, you may want to save the values for your Variable cell values so you can observe or work on them later.
For example, we have calculated the cost per service for only 50 clients in the above model. But you may also want to try different numbers of project clients per month, calculate the minimal service cost, and evaluate the various service costs.
Therefore, Saving and Loading an Excel Solver scenario is important. Saving solver data signifies selecting a range of cells to save the data in, whereas Loading a Solver problem is giving Excel the range of cells where your problem is saved.
Saving the model
Follow the below given steps to save an Excel solver scenario:
- Open your Excel worksheet where you have calculated the output of your solver model and run the Solver. The Solver window will open.
- Click on the Load/Save button located on the right side of the Solver Parameters

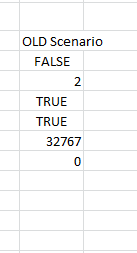
- It will throw a Load/Save Model window asking you to select a specified range of cells to save your scenario. Select the specified number of cells and click the Save button. In our case, we will select 6 cells.
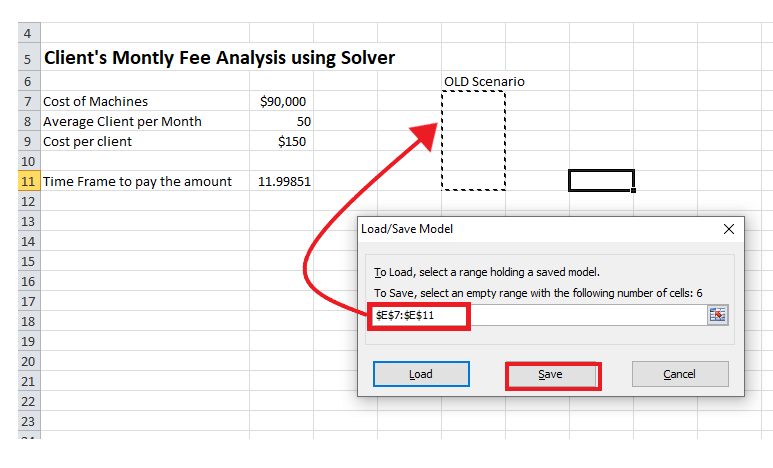
- Excel will save your Solver scenario and will give you the following output. (Refer to the below screenshot).
Loading the saved model
Follow the below-given steps to load or restore a saved Excel solver scenario:
- Open your Excel worksheet where you have calculated the output of your solver model and run the Solver. The Solver window will open.
- Click on the Load/Save button located on the right side of the Solver Parameters

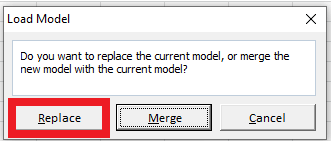
- The Select the previous range of saved cells and click on the Load option.
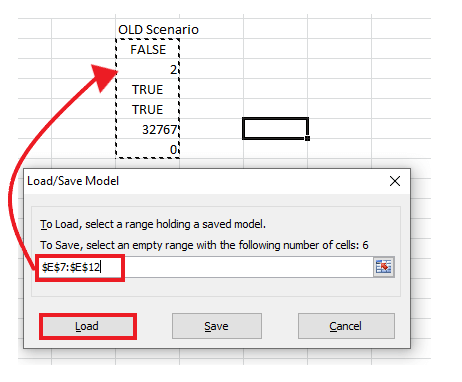
- The Load Modeldialog window will be displayed. Select the Replace
- It will immediately open the Excel Solver window with the parameters of the previously saved model. Just click on the Solve button to recalculate all the solver figures.


