
Share Workbook
MS Excel is currently the most popular spreadsheet software used by a wide range of people worldwide. It has become a great tool to work together on the same workbook from different places around the world in the present times. In the past, if we needed to share a workbook with someone, we could typically send it by attaching it to the mail or print it on paper and physically send it to others. Although the methods were useful, they were not perfect.
When we send a workbook over email to multiple people, it creates multiple copies on different devices. It becomes more difficult when we get the workbook back after others make some changes, and all the changes need to be merged into one workbook. In addition, printing a workbook and sharing it with others makes it difficult to allow them to modify the workbook accordingly.

With concurrent updates, Excel has made it easy to share workbooks and easily collaborate on workbooks. With Excel 2010 and higher versions, we can share workbooks with others and give them user accessibility to allow them to make the necessary edits. In addition, we can keep track of changes made by others to a workbook and accept/reject applicable changes as per our choice. This way, we don’t need to keep multiple versions or hard copies of the files.
Let us discuss step by step tutorial on how we can share the workbook with others, manage user access to the shared workbook, accept/reject changes made by shared users, etc.
How can we share a Workbook for multiple users in Excel?
It is easy to share a workbook with other desired users. We can share it by saving it on a local network location so that the others may get access to it and make necessary changes accordingly. To share the desired workbook, we need to perform the following steps:
- First, we need to open a workbook that we wish to share with others.
- Next, we need to go to the Review tab and click the Share Workbook option from the Changes group, as shown below:
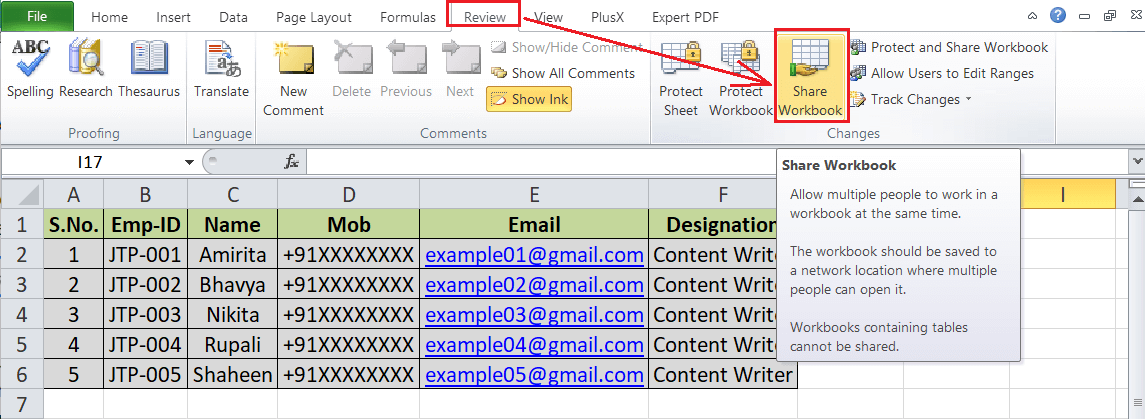
- In the Share Workbook dialogue box, we need to navigate the Editing tab and click the checkbox associated with an option ‘Allow changes by more than one user at the same time. This also allows workbook merging.’

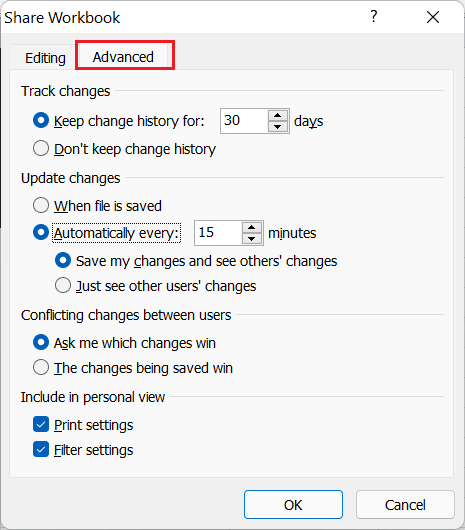
- We can also adjust other preferences under the ‘Advanced’ tab. Using it can decide to keep tracking history, set update preferences, configure conflict changes between multiple users, etc. However, these options are optional.
- Lastly, we must save the workbook to a network location where other desired users can access it. The quickest option to save a workbook is to use a shortcut Ctrl + S. After the workbook has been shared, it displays ‘[Shared]’ next to the workbook’s name. It looks like this:

Now, others can easily work on the same Excel workbook, and we can accept or reject the changes as per choice. Once the work has been done, we can stop sharing the workbook as discussed below in this article.
If Excel prevents us from sharing a workbook or gives any error, we must try the following things:
- If our workbook contains tables or XML maps, we must convert tables to ranges and delete the XML maps. Workbooks with tables or XML maps cannot be shared with others using this method.
- Sometimes, we may need to disable some privacy settings to share a workbook. For this, we need to go to File > Excel Options > Trust Center and click the Trust Center Settings button. Additionally, we must uncheck the box associated with the ‘Remove personal information from the properties on save’ option under the Privacy Options category.

How can we share a Workbook but protect change tracking in Excel?
For additional security or to prevent undesired tempering to a shared workbook, we protect our workbook so that no one turns off the change history or removes the workbook from shared use. For this, we need to perform the following steps:
- After the workbook to be shared is opened, we need to go to the Review tab and click the option ‘Protect and Share Workbook’.

- In the next window, we need to select the checkbox associated with the ‘Sharing with track changes’ option. Additionally, we need to enter a desired password in the Password box. After that, we must click the OK button to apply the changes.

Although a password is optional, it is recommended to prevent others from changing these preferences. - Lastly, we need to save a workbook to a local network location to allow others to access it simultaneously.
After following the above steps, Excel will replace the ‘Protect and Share Workbook’ option with ‘Unprotect Shared Workbook’. Using this option, we can remove the protection from the shared workbook or stop sharing it with others if necessary.

Note: If the workbook has already been shared and we want to protect sharing with the password or protect tracking, we must stop its sharing and follow the above steps.
How can we edit the shared Workbook in Excel?
If someone has shared a workbook with us, we can open it like any other workbook. Also, we can enter new data or modify the existing data as per our choice. However, we must identify our work in a shared workbook by using the following steps:
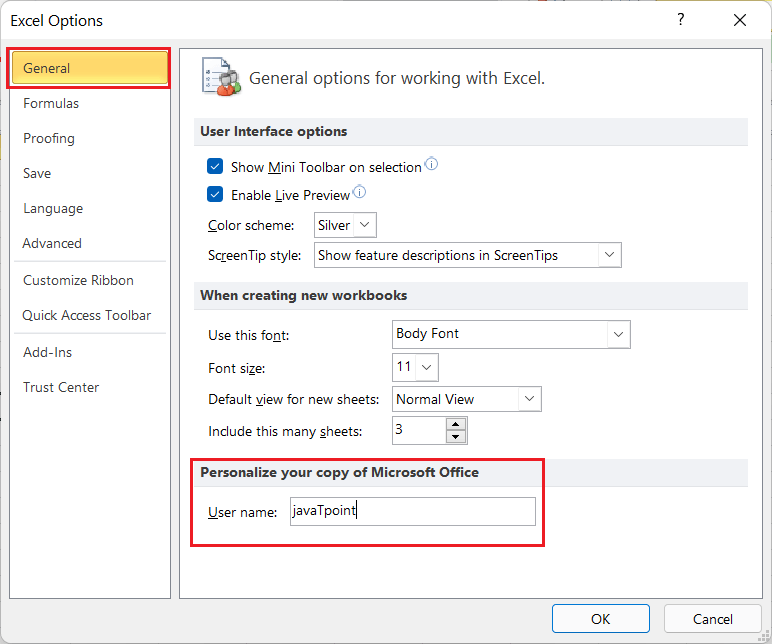
- First, we have to click on the File tab and click on Options.
- Next, we need to click on the ‘General’ option in the Excel Options window and locate the option named ‘Personalize your copy of Microsoft Office’.
- Finally, we need to enter the name inside the box next to the username we want to show to the owner and other members.
After that, we can make necessary changes to a workbook using the allowed features, and other people will know when we make changes to a shared workbook.
How can we merge different copies of a shared workbook?
Sometimes we may need to keep the edits private that different users in a shared workbook make. In such a case, we can allow others to save their copy of the shared workbook to the same local network location using different filenames. After all the corrections, we can merge all changes to a single workbook by using the following steps:
- First, we need to add a shortcut for ‘Compare and Merge Workbooks’ to our quick access toolbar. For this, we can customize our quick access toolbar and add the corresponding command from the list.

- Once the shortcut has been added, we must open a primary version of the shared workbook and click the shortcut ‘Compare and Merge Workbooks’ from the quick access toolbar.

- Next, we need to select all the copies of the workbooks saved by others and click the OK button. We can hold the Shift key while selecting the files to choose multiple files or workbooks. This will merge all the changes made by others into a single workbook.
How can we highlight changes made by other users in a Workbook?
Excel also allows us to highlight all the changes made by others. To highlight the changes in a shared workbook, we need to perform the following steps:
- With the file opened in Excel, we need to go to the Review tab and click the drop-down icon associated with ‘Track Changes’ in the category Changes.

- Next, we need to select the option ‘Highlight Changes’ from the list.

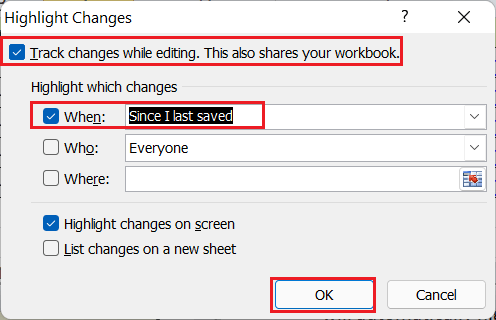
- After the previous step, Excel will display the ‘Highlight Changes’ dialogue box. We must enable the track changes option to decide further preferences accordingly, as shown below:
- Lastly, we must protect the shared workbook using the method we discussed above in this article. This will prevent others from removing the change history.
Now, whenever someone adds new data or edits the existing data in a shared workbook, Excel will automatically highlight the changes. It creates a small triangle in the top-left corner within the cells where changes have been made. Additionally, we can click on any particular cell, and Excel will show more details about the changes.

How can we accept/ reject changes made by other users in a Workbook?
We can accept or reject the changes made by other users as per our like. For this, we need to follow below steps:
- With the file opened in Excel, we need to go to the Review tab and click the drop-down icon associated with ‘Track Changes’ in the category Changes. Next, we need to select the option ‘Accept/Reject Changes’ from the list.

- In the next window, we need to choose the preferences accordingly, as shown below:

- After completing the previous step, Excel will display an additional window with all the changes made by users in the shared workbook. We can select any of the changes from the list and decide whether to accept or reject using the given buttons.
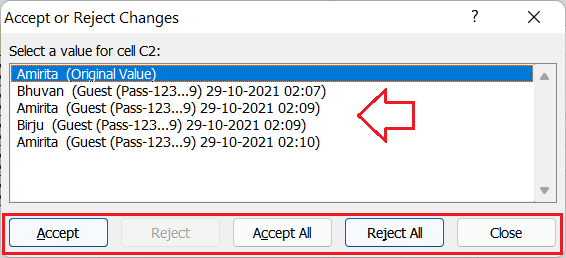
- Once all the changes have been decided, we can click the Close button and save the workbook to keep all the desired changes.
How can we remove users from a shared Workbook?
Sometimes, we may need to remove specific users from the shared workbook. We can do this by following the steps below:
- With the shared workbook opened, we need to go to the Review tab and click the ‘Share Workbook’ button under the group ‘Changes’.

- In the next window, we need to select the particular user and click the Remove button. Once all the undesired users are removed, we must click the OK button to save the changes.

It is important to remember that the above steps only remove the selected users for the current session. However, users can reopen the same workbook from the network location and start editing it again. Therefore, it is best to stop sharing a workbook after the work has finished.
How to un-share or stop sharing a Workbook?
Once the work has been done with final changes, we must stop sharing the workbook to prevent any undesired changes. We can stop sharing a workbook by using the following steps:
- With the shared workbook opened, we need to go to the Review tab and click ‘Share Workbook’ under the group ‘Changes’ button.
- In the Share Workbook dialogue box, we need to deselect the checkbox associated with an option ‘Allow changes by more than one user at the same time. This also allows workbook merging’ under the Editing tab.
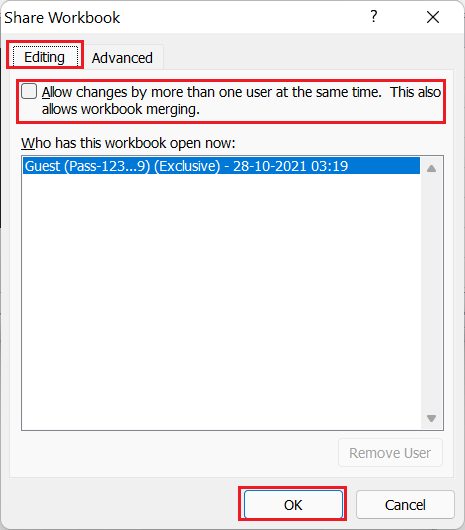
- Finally, we have to click on the OK button. This will prevent other people from accessing the workbook or making further changes.
How can we share a Workbook via OneDrive?
To share a workbook via OneDrive in Excel 2013 and lower versions, we need to go to File > Share > Save to Cloud. After that, we need to enter the email address of the person and click the Share button.

In Excel 2016 and higher versions, we can directly share a workbook by using the Share button from the top-right side of the Excel window. We can either invite others using their email addresses or by sending them an invite link.

Benefits of Sharing a Workbook
There are multiple benefits of sharing a workbook, such as:
- Team members can work simultaneously on the same workbook from different locations.
- There will be no difficulty in managing multiple copies of a workbook, and all the changes by everyone will be applied in a single workbook.
- We don’t need to send copies of a workbook over email to many people.
- Sharing a workbook is so useful when collecting data for surveys from many users.
- Everyone who has access to a shared workbook can download a copy of a workbook to keep a record of their changes.
Limitations of Sharing a Workbook
Although sharing a workbook can be useful for various reasons, it has some limitations. Whenever we share a workbook with others, there may be trouble for others accessing some workbook features. It happens because not all the features are currently supported in shared workbooks. The following table lists down some such features that may cause trouble to users when using them:
| Array Formulas | Merging Cells |
| Charts and Pictures | Macros |
| Conditional Formatting | Slicers and Sparklines |
| Data Validation | Sorting and Filtering by Format |
| Excel tables and PivotTable Reports | Subtotals |
| Grouping or Outlining Data | Worksheet Protection |
| Hyperlinks |
The above table displays only some limited features; however, many other features do not work in shared workbooks. Besides, the owner will only be able to use the existing features, and the owner cannot add or change features after the workbook has been shared with others. Therefore, if the owner needs to use any of the above features, it must be implemented before sharing the workbook.


