
Print Worksheet in Excel
MS Excel is powerful spreadsheet software that is widely used across the world. This is quite common when users share data from a spreadsheet or an entire workbook with others. Although there are many sharing options in Excel, there may be cases when we may need to print the data on paper to share with someone. Also, there may be other reasons to print one or worksheets from the workbook.
Generally, it seems much easier to print a worksheet using the Print button. However, this does not always mean that a beautifully formatted sheet that looks good on a monitor will also print beautifully. In reality, it’s a mess in most cases because Excel spreadsheets are primarily designed for viewing and editing on a computer screen, not for printing comfortably on a sheet of paper. However, Excel provides us with various customization options before finalizing our prints. We can make our worksheets fit perfectly on the paper sheet using precise settings.

This article will discuss how to print worksheet data on paper appropriately. Using the appropriate knowledge, we can decide whether to print a specific area of the worksheet, the entire worksheet, multiple worksheets, or all worksheets at once.
How to print in Excel?
It is quite easy to print one or more worksheets in Excel. Let us first understand the steps to print the worksheet in Excel, and then we will discuss more details on each essential feature of printing. The following steps must be performed to print any Excel worksheet:
- First, we need to open a specific Excel file and select the worksheet from the Sheet tab.

- Next, we need to go to the File tab and click the Print option from the list.
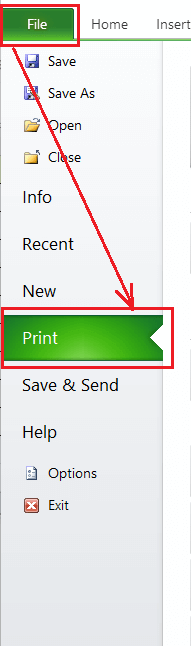
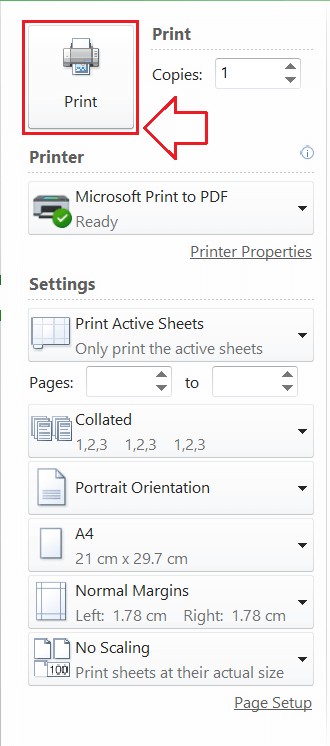
- After clicking the Print option, we can choose desired printing preferences (such as the number of copies, printer, orientation, etc.) and finalize the printing process by clicking the Print It looks like this:
Quick Print: Adding a Print button on Quick Access Toolbar
We can use the Quick Print option if we don’t want to change default printer settings but print a copy instantly. There are two following ways to use this option:
- We can use the keyboard shortcut Ctrl + P and press the Enter key. We don’t need to use a mouse this way.
- We can use the Print shortcut or button from the Quick Access Toolbar (QAT). However, the shortcut must be added to QAT before using it.
Adding a Print tool on QAT
We can perform the following steps to add a quick print shortcut button on the quick access toolbar:
- First, we need to click on the Customize Quick Access Toolbar button (drop-down arrow) from the top of the Excel window.
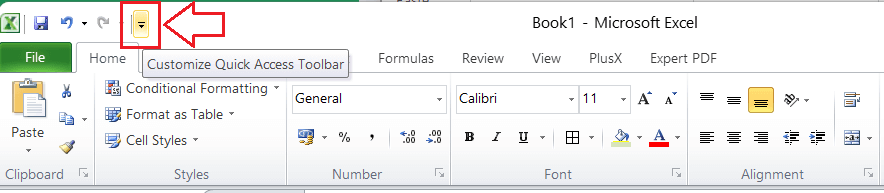
- Next, we need to click on the ‘Print Preview and Print‘ option from the list to activate this tool on the quick access toolbar.

- After adding the shortcut, we can click on the shortcut to quickly print the worksheet in Excel.

The Print button on the quick access toolbar is useful to print in Excel frequently. We only need to add the Print Tool shortcut on the Quick Access Toolbar once, and it will be available for all Excel workbooks, whether existing or new.
Print Preview in Excel
After giving the print command in Excel, it displays the Print Preview window to see various print settings and a preview pane. It is always recommended to check the preview pane before finalizing the print to ensure that it looks similar to the way we want it on paper. This can help us save paper, inks, and time.

The print preview pane displays the virtual copy of the print to help us understand how the worksheet contents will look on paper. Additionally, we can adjust certain settings directly from the Print Preview window.
Unfortunately, the Excel Print Preview pane does not provide a zoom-in and zoom-out button. However, we can use the common shortcut Ctrl + mouse scroll wheel to adjust the zoomings to some extent. To remove the zooming and go back to the normal view, we can click on the ‘Zoom to Page‘ button from the bottom right corner of the print preview pane. In addition, we can use the previous and next buttons to check the print preview in multiple print pages.
Choosing Printing Options: What to print?
When we need to adjust settings to choose which data and objects need to be printed from the worksheet, we must click the drop-down arrow next to ‘Print Active Sheets‘ text under the Settings option:

Let us understand each option present in the above image:
Print Entire worksheet(s)
When we want to print the entire worksheet in the view area (active sheet from the Sheet tab), we must click the ‘Print Active Sheets‘ option.
If we want to print specific worksheets (or multiple worksheets) from the workbook, we must select all the desired sheets with the mouse while holding the Ctrl key. After selecting the effective sheets, we must click the ‘Print Active Sheets‘ option.
Print Selection/ Range
When we want to print the specific area (a cell or range of cells) of the worksheet, we need to select/ highlight the particular area and click the ‘Print Selection‘ option. We can also select the no-adjacent cells to print. To select non-adjacent cells or ranges, we can press and hold the Ctrl key while selecting the desired cells.
Print Entire Workbook
When we need to print all the worksheets present in a workbook, we must click the ‘Print Entire Workbook‘ option.
Print Excel table
When we want to print an Excel table from the worksheet, we need to click or highlight any cell of the table and click the ‘Print Selected Table‘ option. The option ‘Print Selected Table’ will only appear after selecting the table or part of the table on the worksheet.
Printing the same range in multiple sheets
When we have a workbook containing several similarly structured worksheets, such as a sales report or invoice, we may need to print the same specific range from each worksheet. Excel enables us to print the same desired range from all the worksheets in the same workbook. We need to follow the below steps:
- First, we have to select the first sheet and select or highlight the specific range of cells required to print.
- After selecting the desired range in the first sheet, we need to hold down the Ctrl key and select other non-adjacent sheets from the Sheets If we want to print the same range from all adjacent sheets, we can select the first and last sheet while holding the Shift key.

- After selecting the sheets, we must use the quick print shortcut Ctrl + P and click on the ‘Print Selection‘ option. Lastly, we must click on the Print tile (or press the Enter key).

We should check the number of pages to be printed in preview mode to make sure all ranges will print. If we have selected one range per worksheet, the number of pages must equal the number of sheets selected. If two or more ranges are selected from multiple worksheets, each range will be printed on individual pages.
Adjusting Print Properties
When we give print command to excel worksheet, Excel displays various settings which we can adjust to make excel worksheet look good on paper. The following are some essential settings or properties to ensure that our worksheets look the way we want them on paper:
Multiple Copies
When we need to print multiple copies of a worksheet, we can use the up-and-down arrows to increase or decrease the number of copies to be printed. If there are multiple pages in a single copy, we can keep them collated or uncollated.
For instance, if we print 5 copies, the Collated option helps us print the entire first copy, the entire second copy, etc. Besides, the Uncollated option will print 5 copies of page 1, 5 copies of page 2, and so on.

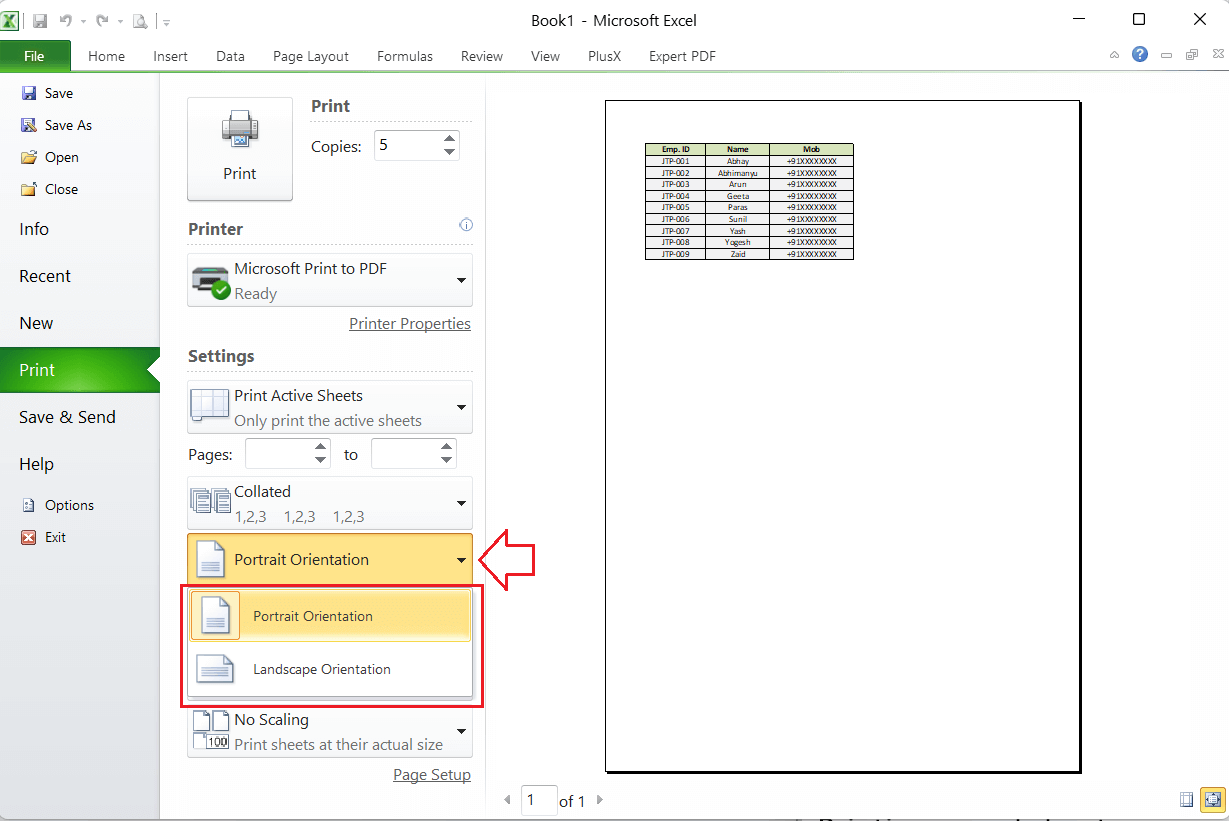
Orientation
Excel allows us to choose the orientation of the printout between portrait and landscape. Portrait orientation displays more rows but fewer columns on paper, while landscape orientation does the opposite. Landscape orientation displays more columns but fewer rows on paper.
We can choose the desired orientation of the printout under the Settings option, as shown below:
Page Margins
Excel enables us to adjust the page margins in various ways. We can either select any default margins, such as normal, wide, and narrow, or adjust them as desired using the drag-drop method via the mouse.
To choose a predefined margin style, we need to click on the drop-down arrow icon next to Margins and choose the desired margin setup.

To manually adjust the margins, we need to click on the ‘Show Margins’ icon from the bottom right corner of the print preview window. This will enable lines to margin with markers. We can then drag-drop the lines accordingly using the mouse to adjust the page margins manually.

Pages
If we have multiple pages in our worksheet and we need to print a specific range in a sequence, we can specify the pages to print. We have to enter the range of pages from the starting page to the last page, and all the pages of the given range will be printed. Moreover, when we need to print a specific worksheet page, we can enter the page number in the first box and give the print command.

Scaling
Excel usually prints worksheets as per their actual sizes. This means that the more data we have in the worksheet, the more pages it will take for printouts. However, we can print an Excel worksheet on a single page by adjusting the Scaling settings. The scaling options can be accessed from the bottom of the print preferences/ settings from the Print Preview Pane.
The Scaling options are as follows:
- No Scaling: This option helps remove scaling.
- Fit Sheet on One Page: This option shrinks the worksheet contents to fit on one page.
- Fit All Columns on One Page: This option prints all columns on one page while rows can be split across multiple pages.
- Fit All Rows on One Page: This option prints all rows on one page while columns can be split across several pages.
We must be careful while printing worksheet data on a single page as huge data can be shrunk to become unreadable. Excel does not give any error even if the data is unreadable.
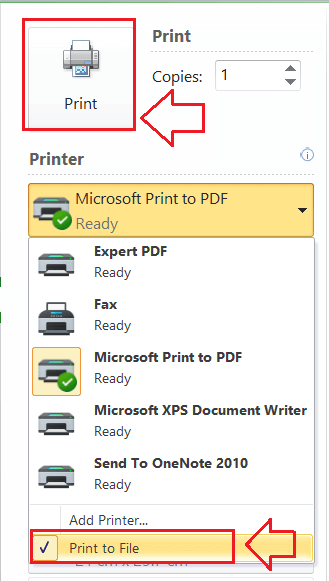
Printer
Before finalizing the printout, we must ensure that the correct printer is selected as the default. To choose a printer, we need to click the drop-down arrow icon under Printer, as shown below:

If no printer is connected to the computer, Excel allows us to save a worksheet to a file, such as PDF, XPS, etc. The file is saved with the worksheet data and can be printed later when the printer is available on the computer.
Printing a worksheet to file: Saving for future use
Printing to file is one of the essential features of Excel. It helps us create a PDF copy of the Worksheet, Selected Range, or entire Workbook. However, it is rarely used or underestimated by many. But, it can be very helpful sometimes. We can save the output to a PDF file instead of sending it to be printed by the printer. That way, we don’t have to modify the settings whenever we want to print it on paper. We need to open the PDF version and give the print command to the printer. In addition, it allows us to easily share the non-editable copy of the worksheet with others as it is not easy to edit the PDF version of the worksheet.
We can perform the following steps to print a worksheet to a file (PDF):
- We need to select the specific range or worksheet to print. We should go to the Page Layout tab and adjust the print settings like margins, scaling, orientation, etc.

- Next, we should use the quick print shortcut Ctrl + P. In the next window, we need to click on the drop-down list under Printer, as shown below:

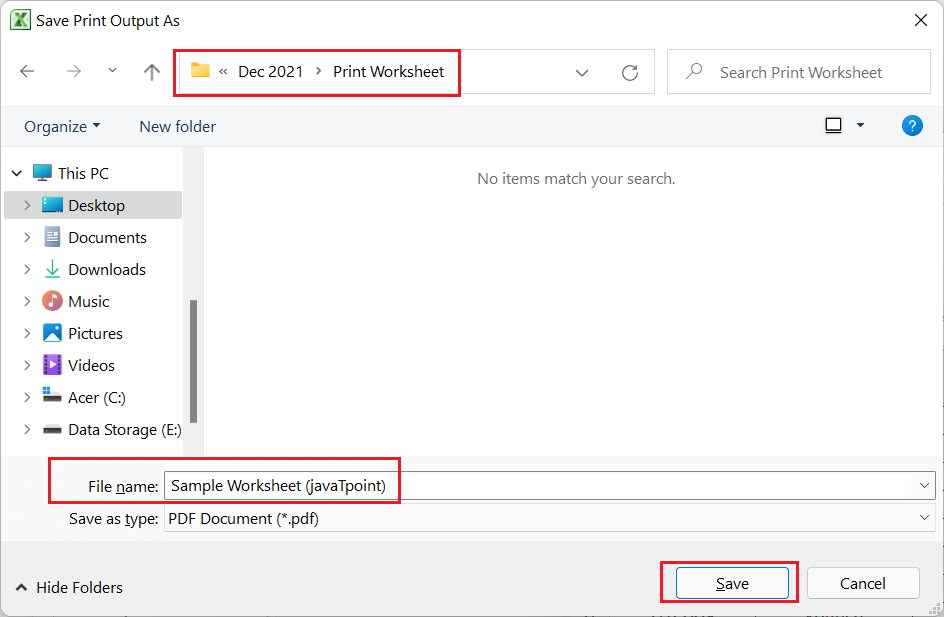
- We have to select the ‘Print to File‘ option from the list and hit the Print This will launch Save As dialogue box in File Explorer.
- We can enter the desired name using File Explorer to save the file. Also, we can choose the location to save the file containing the worksheet contents.
Inserting Page Breaks to Worksheet
When we need to print large spreadsheets, we can control the way the contents of a worksheet are divided (or printed) across different pages. For this, we need to insert page breaks in certain areas. We must perform the following steps to insert page breaks in Excel:
- First, we must select the specific row or column to move to a new printed page.
- Next, we need to go to the Page Layout tab, click the drop-down icon under Breaks, and choose the ‘Insert Page Break‘ option from the Page Setup group.
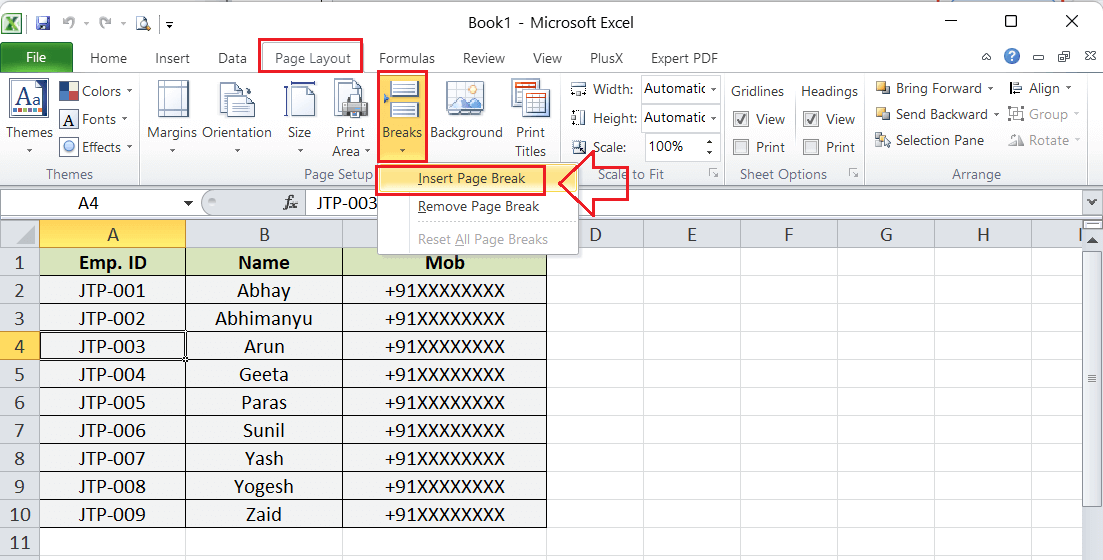
- As soon as we click the ‘Insert Page Break’ option, the same is instantly inserted into a selected area. To check page breaks on the spreadsheet, we need to go to the View tab and choose ‘Page Break Preview‘.
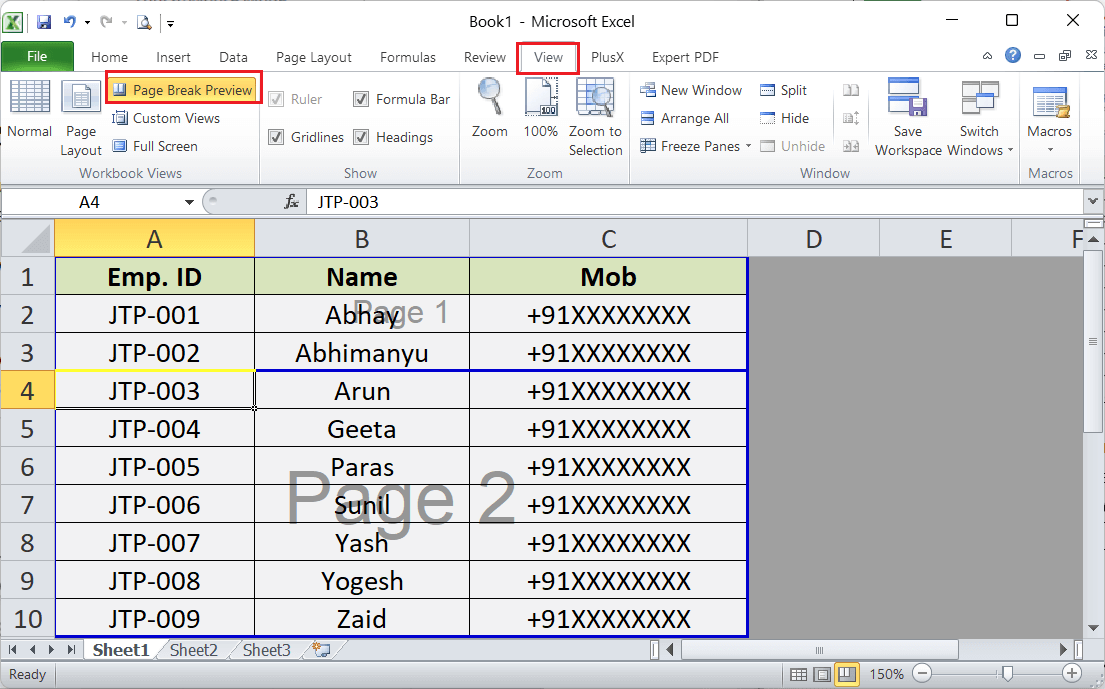
The image above displays page breaks in blue lines, including page numbers that separate the sheet’s contents. We can also change the position of a specific page break by dragging the blue lines using the mouse.
To remove page breaks, we can go to Page Layout > Breaks > Remove Page Breaks after selecting the same cell that we selected while applying page breaks.
Printing Formulae
If we have multiple formulas within the worksheet that we want to print instead of their calculated values, we need to enable the ‘Show Formula’ option in an Excel worksheet. To enable the formula, we must go to the Formulas tab and click the ‘Show Formulas‘ tool from the Formula Auditing group.

After that, we can print the worksheet as usual.

Printing Worksheet Chart
When we only need to print a specific chart from the Excel worksheet, we need to select the particular chart and press the quick print shortcut key Ctrl + P. After that, we need to choose the ‘Print Selected Chart‘ option under Settings from the Print Preview window. If the preview looks good in the Print Preview pane, we can finalize the printout by clicking the Print button. We can change other print settings as usual.

It is not allowed to change the scaling of the chart from the Print Preview pane. So, we need to resize the chart from the sheet window and make it bigger to fit the whole page.
Printing worksheet with Gridlines
By default, the gridlines are not printed when we print anything in Excel. However, we can choose whether to include gridlines and heading to print. We need to go to the Page Layout tab and select/deselect the checkboxes before the Print option under Gridlines from the Sheet Options group.

After selecting the checkbox for the Gridlines Print option, the gridlines will be printed along with the worksheet contents.
Likewise, we can tick/ untick the checkbox for Headings to include or remove them to a printed copy of the worksheet.
Important Point to Remember
- Excel does not display any errors when the print becomes unreadable on paper. So, we must check the print preview window before finalizing the printout.
- It is very difficult to adjust margins from the print preview window.
- It is recommended to print worksheets with gridlines or borders so that it is easier to differentiate cell boundaries and read the data correctly.


