
How to change the Date Format in Excel?
Excel, a powerful spreadsheet software, allows users to record various data types in one or more desired cells across several worksheets. In addition to numbers, and text, we often require entering dates and times in an Excel sheet. No matter how we type the dates in Excel, it automatically picks up the default format as it is set in Excel’s settings (or Control Panel).
For example, if the configured date format in the settings is “M/d/yyyy”, Excel will format the given or entered date “1st Jan 2021” as “1/1/2021”. Excel will keep formatting dates as “M/d/yyyy” until we change the settings in Excel or the date format recorded in an Excel cell. If we change the date format from the settings, the newly given format will be the default format and be followed in the future. Thus, it is better to learn how to change the date format in Excel sheet to change how the dates appear in Excel cells differently.
Note: The date system in Excel for Windows starts from January 1, 1900. However, for Mac, it starts from January 1, 1904. That means we cannot type or enter the dates before the specified starting dates in the respective platforms.
Dates in Excel
Before discussing the methods to change date formats within our Excel sheet, we must know how dates are treated and stored in Excel. Generally, it seems like Excel remembers the given date based on its day, month and year. However, this is not the case in how dates work in Excel.
It is quite unbelievable, but the fact is that a date is nothing but the numbers in Excel. Excel stores and remembers the given date in the form of sequential numbers. However, it enables users to choose between various cell formatting to display the respective number as a valid date, including the date, month and year accordingly.
Numeric Date Format
If there is no specific date format is applied in Excel (or changed from Date to General/Standard), we usually see numbers or integers within the cell with dates recorded. The dates stored as integers typically represent or display the number of days since 01/01/1900 (on Windows) or 01/01/1904 (on Mac).
For example, if we enter any positive number (i.e., 1) in an Excel cell with ‘General’ formatting and change it to ‘Date’, it becomes January 1, 1900. It occurs because the integer ‘1’ represents the starting date, i.e., January 1, 1900. Likewise, the number ‘0’ is formatted as January 0, 1900, and calculated as of December 31, 1899. The last date supported in Excel for calculation is December 31, 9999, representing the integer 2958465.
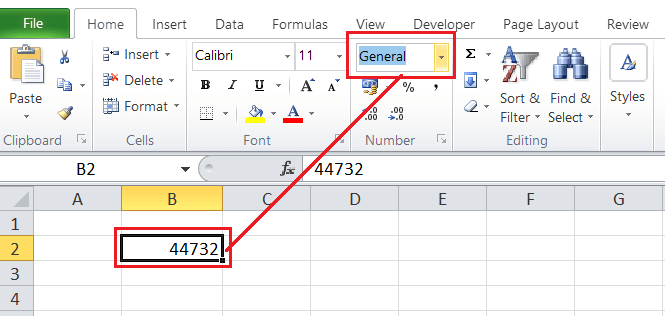
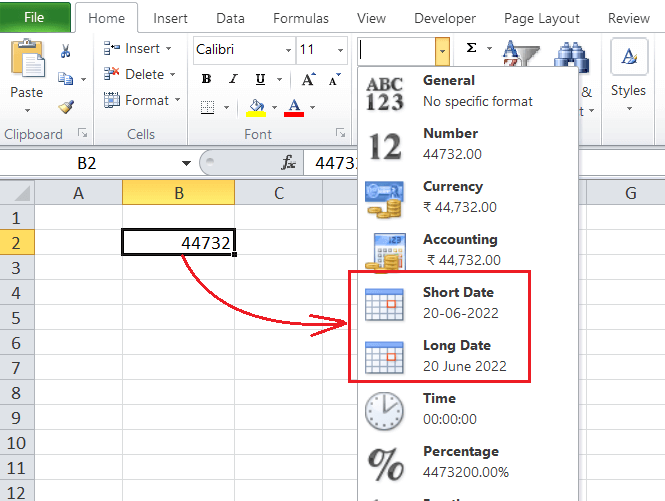
Therefore, if we record June 20, 2022, in General format, it will become 44732 because 44732 days passed from January 1, 1900, to June 20, 2022.
Quick Date Formats
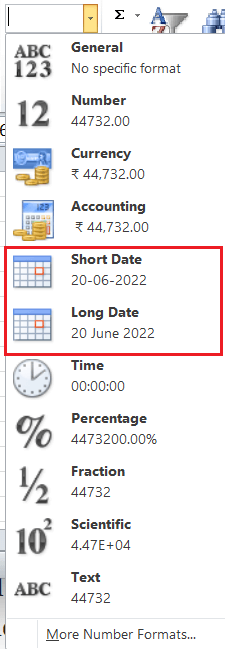
Although we can choose a wide range of date formats in Excel, the most common formats are the ‘Short Date’ and ‘Long Date’.
- Short Date: The dates are displayed with the default settings but in a shorter form. It usually follows the format m/d/yyyy. For example, 20-06-2022.
- Long Date: The dates are displayed with the default settings but in a longer form. It usually adds the month’s name. For example, 20 June 2022.
The short date and long date formats may vary from version to version in Excel, depending on the default settings.
We can quickly choose between these two formats and apply them to the desired cells with dates. For that, we have to execute the below steps:
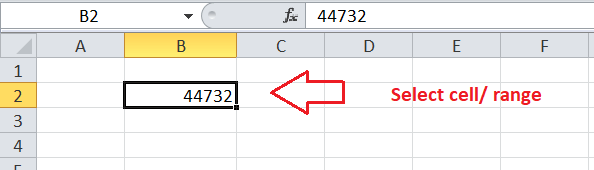
- First, we must select one or more cells containing the dates we want to format.
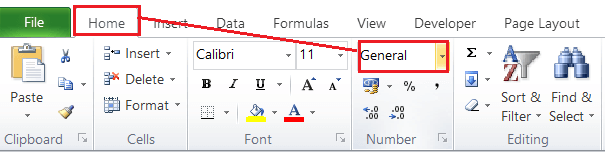
- Next, we must go to the Home tab and click the drop-down list under the Number section.
- Lastly, we need to select the desired format (Short or Long) by clicking on it. The corresponding date format will appear instantly within the selected cells or a range.
Changing Date Formats in Excel
No matter if we have the date in numeric form, short or long format, we can always change its format to other desired formats. The following are two commonly used ways to change date formats in an Excel sheet:
Choosing from Advanced Date Formats List
Excel offers a wide range of predefined date formats that can be used on the desired cells immediately. We need to use the ‘Format Cells’ dialogue box to access the list of advanced date formats. We must execute the below steps to change the date format using the ‘Format Cells’ option:
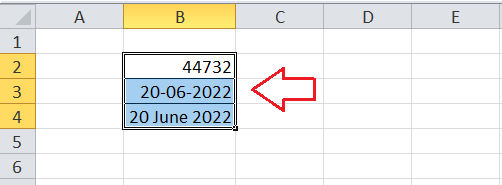
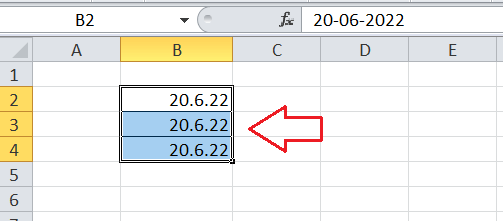
- First, we need to select one or more cells in the worksheet where we want to change or apply the date format. For example, we select cells B2, B3, and B4. Each cell has a different date format, and we need to change them into a specific format by choosing from the advanced list.
- Next, we must press the right-click button via the mouse on the selected cells and choose the ‘Format Cells’ option.
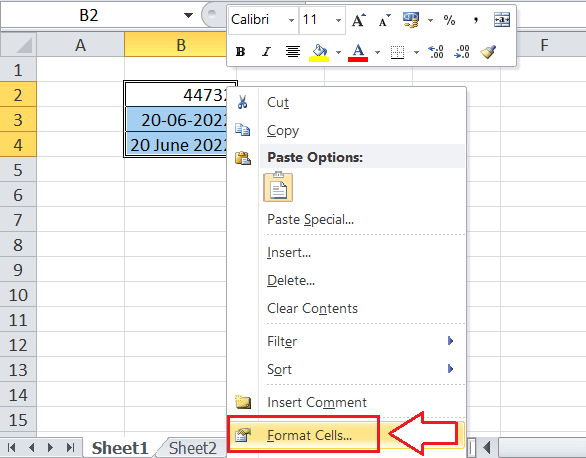
Alternatively, we can press the keyboard shortcut ‘Ctrl + 1’ to launch the Format Cells window. However, the numeric ‘1’ must be pressed from the number pad area of the keyboard. - In the Format Cells window, we must navigate the Number tab and select the category named ‘Date’ from the left pane. When we click on the ‘Date’, we see a list of various date formats under the section ‘Type’. It looks like this:

- We need to locate the desired date format and select it accordingly in the list. We also see a preview of the selected format under the section ‘Sample’ above the ‘Type’ section. In our case, we select the format d.m.yy.
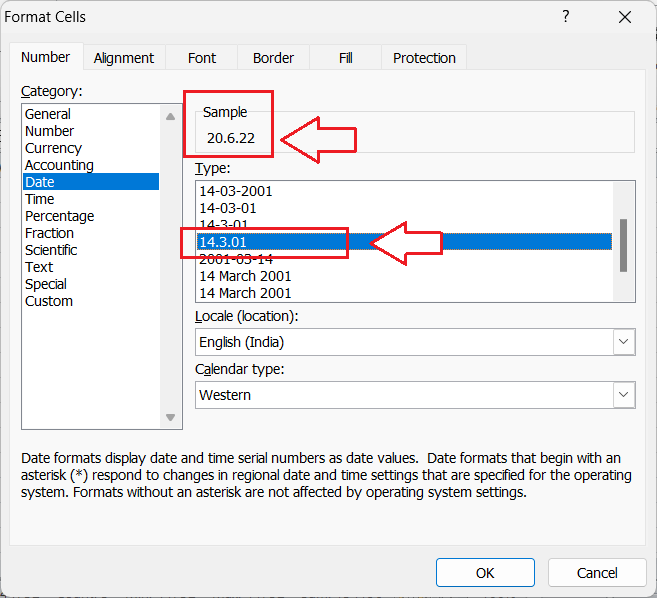
- Once the desired date format is selected, we must click the OK button. The corresponding date format will appear on all the selected cells, as shown below:
Although the desired date format is applied in the above image, we see a regular date format on the formula bar. The Formula Bar usually displays the date format based on the settings configured in the Windows Control Panel.
Creating Customized Date Formats
If we don’t like predefined or standard date formats, we can always create our customized format and use them in the desired cells within the sheet. We must execute the below steps to create our custom date format in Excel:
- Like the previous method, we first must select one or more cells to apply the new date format.
- Next, we must open the Format Cells (Ctrl + 1) dialogue box, similar to the previous method. In the Format Cells window, we must navigate to the ‘Custom’ category under the ‘Number’ tab. We must type or enter the desired date format under the ‘Type’ box using specific formatting date codes.
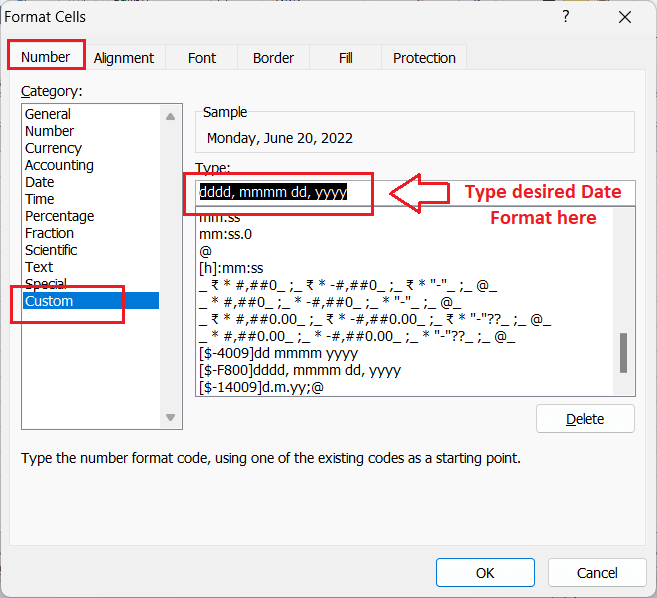
- Lastly, we must click the OK button to apply the given date format to our cells or a range.
Before following the above steps and creating a custom date format, we must know the formatting codes required to create the date’s structure.
List of Formatting Codes in Excel
The following table has various codes with their description and examples, which we can use to create a custom date format in Excel:
| Code | Description | Example |
|---|---|---|
| d | To display the number of the day without leading zero | 1 – 31 |
| dd | To display the number of the day with a leading zero | 01 – 31 |
| ddd | To display the name of the day of the week in a shorter form | Sun, Mon, Tue, etc. |
| dddd | To display the name of the day of the week in a complete form | Sunday, Monday, Tuesday, etc. |
| m | To display the number of the month without leading zero | 1 – 12 |
| mm | To display the number of the month with a leading zero | 01 – 12 |
| mmm | To display the name of the month in a shorter form | Jan, Feb, Mar, etc. |
| mmmm | To display the name of the month in a complete form | January, February, March, etc. |
| mmmmm | To display the name of the month’s first letter | J, F, M etc. However, J stands for January, June and July. Same for others. |
| yy | To display the last two digits of the year | 22 |
| yyyy | To display the complete year, all four digits | 2022 |
The easiest method to create a desired custom format for the dates is to start with any existing date format in the list. That means we can choose any specific date under the ‘Type’ box from the ‘Date’ category, then move to the ‘Custom’ and change the selected format accordingly.
Let us now implement the above formatting codes and learn to create our customized date format using the sample dataset in an Excel sheet.
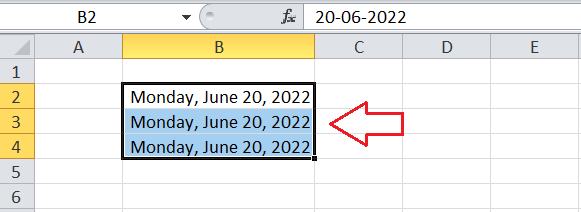
Example: Suppose we have the dates in different formats in cells B2, B3, and B4. We want to change the format to a custom format (dddd, mmmm dd, yyyy) for all these cells.
To use our custom date format, we first select all the corresponding cells containing dates in our sheet. Afterwards, we go to the Format Cells window, choose the Custom category and enter our custom format in the Type box. It looks like this:
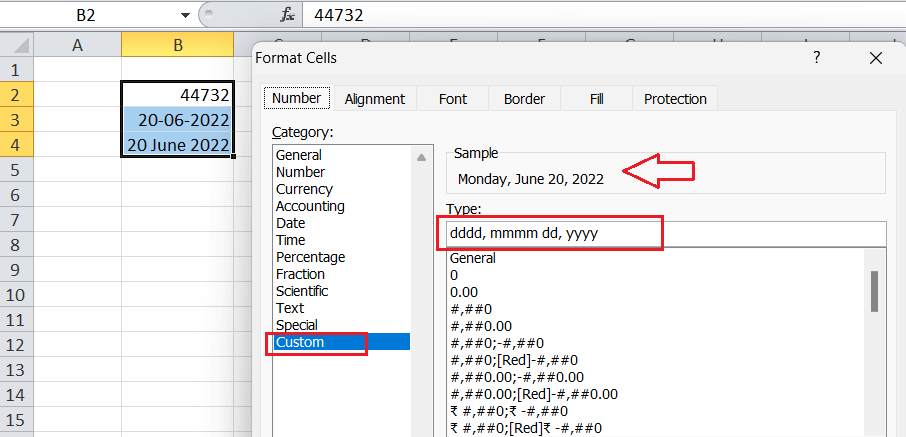
Since the date preview is right, we click the OK button to apply the same format to all selected cells. The dates appear based on the given format, such as: dddd, mmmm dd, yyyy.
Converting Date Formats to Other Locales/Locations
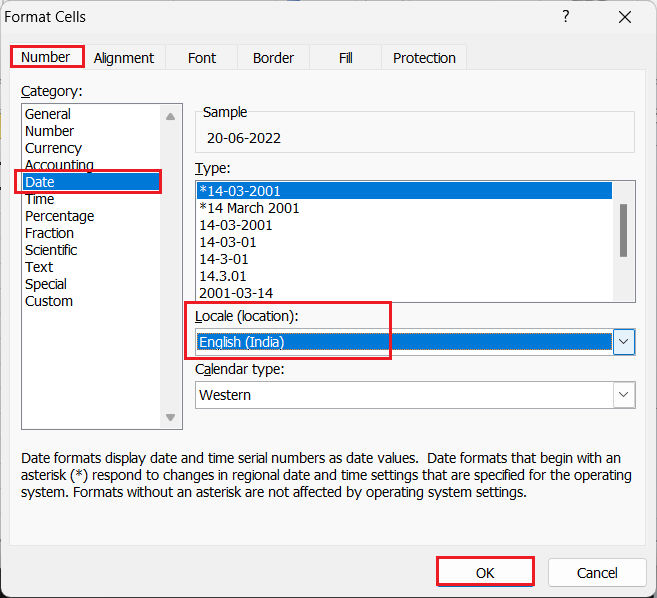
If we need to display dates for different locations, we must convert the date formats to a different locale. For that, we can execute the below steps:
- First, we must select the cells to apply locale (location). Next, we must go to the Format Cells (Ctrl + 1) window.
- In the Format Cells window, we need to navigate the ‘Date’ category under the ‘Number’ tab and locate the drop-down menu under the ‘Locale’ section. We must select the desired locale from the list and click the OK button to apply changes.
Apart from this, we can also customize the locale settings for the dates in an Excel cell using the Custom format. We only need to create or select the desired format and prefix a date with the desired locale, meaning that we can add a locale before the custom date format accordingly. However, we must only use the specific locale codes formatted as [$-###].
Some essential codes and their locale are as follows:
| Code | Location |
|---|---|
| [$-409] | English, United States |
| [$-804] | Chinese, China |
| [$-807] | German, Switzerland |
| [$-1009] | English, Canada |
| [$-804] | Bengali, India |
| [$-407] | German, Germany |
| [$-404] | Chinese, Taiwan |
There are many more locale codes for various locations on the globe.
Suppose we want to change the date format containing a year-month-day (day of the week) for the location in Germany. So, we must apply the custom format in the following way:
[$-407]dddd, dd. Mmmm yyyy
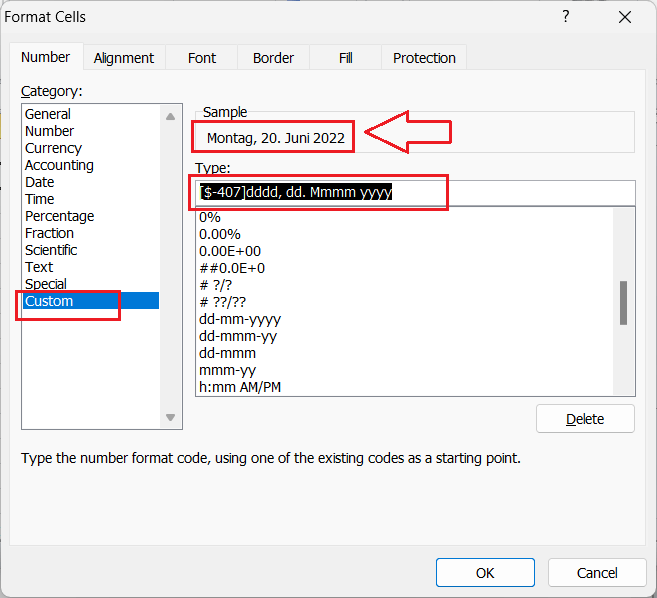
The above image shows the date in German as we used the locale code of Germany, i.e., [$-407].
Changing the Date Format using the TEXT function
Excel’s TEXT function also helps us change or apply the desired Date Format in Excel. The function only requires two arguments and follows the below structure (or syntax):
=TEXT(Value to convert into text, “Formatting code”)
The first argument can be represented as a cell containing a date, a numeric form of date, etc. The second argument is the Formatting code that we have already discussed above.
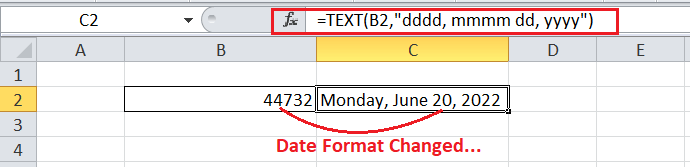
For example, suppose our date (numeric form) is in cell B2, and we need to change its format to: dddd, mmmm dd, yyyy. So, we can use the TEXT function in another cell using the below formula:
=TEXT(B2,”dddd, mmmm dd, yyyy”)
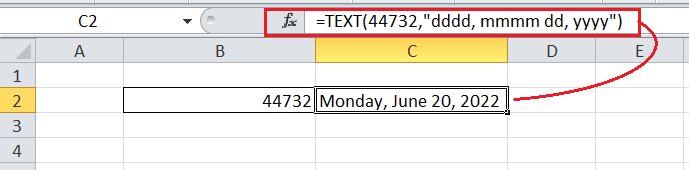
Instead of the date cell, we can also insert the numeric date in the formula directly, i.e.:
=TEXT(44732,”dddd, mmmm dd, yyyy”)
Important Points to Remember
- After changing the date format, if we see code ##### instead of the proper date, we should ensure that the cell is wide enough to hold the entire date. We can double-click on the right-hand border of the column header to expand the width to fit the entire date correctly.
- When we import the date in Excel, Excel treats them as TEXT. If there are imported dates in the sheet, we must change the TEXT to DATES before changing its format.
- It is recommended to use the TODAY() function if we need any cell always to display the current date. However, the date format can be applied based on the choice or requirements.
- Before changing the date format for the desired cells, we must ensure that the cell does not contain additional text values or symbols. If the date is written with an additional text, the entire cell will be treated as the text cell.
- If negative numbers are formatted as dates in Excel by default, we must change the Excel settings to fix it. We must select the corresponding cell (s) and navigate to Excel Options (or Excel Settings) > Advanced > Use 1904 date system > OK.


