Flash Fill in Excel
Excel is one of the powerful suits provided by Microsoft. It incorporates user friendly tools and amazing features and one such incredible feature is Flash Fill. This tool eliminates the manual process where the user had to invest their time by typing the data. Not only does it take hours to be performed but often leads to many typing errors. To save time and prevent typo errors Excel came with the Flash Fill option that executes the same operation automatically (if it involves any pattern) in a flash.
In this tutorial we will briefly discover the fundamentals of the Flash Fill functionality including its definition, shortcuts, various Flash Fill options and will perform examples using Flash Fill in Excel.
What is Flash Fill?
“Excel Flash Fill is a special feature introduced by Microsoft that examines the data entered by the user and if it involves any kind of pattern it automatically fills the remaining information in a single click.”
Flash Fill quickly copes with several different tasks that otherwise need complicated formulas or even lengthy VBA code, unlike splitting and merging strings, sorting the data and correcting deviations, formatting the content or the numbers, turning dates figure to the required format, and a lot more.
Every time you apply Flash Fill to your Excel worksheet at the backend to accomplish that, it merges millions of multiple small programs, sorts those program snippets utilizing machine-learning algorithms, and ascertains the flawless job. To our surprise, all these activities are done in milliseconds. Therefore delivering the output almost immediately!
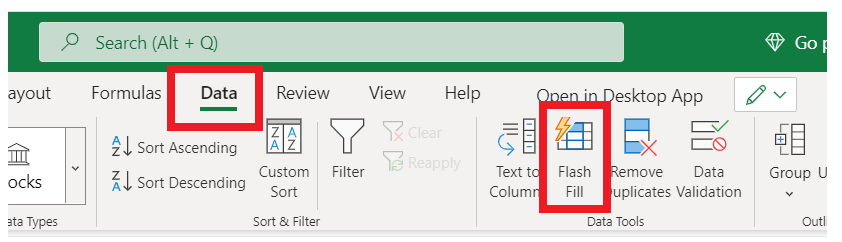
Where is Flash Fill in Excel?
In Excel, to locate the Flash Fill tool, follow the given steps:
- Go to the Data tab.
- In the Data Tools group, you will find the Flash Fill option.
Flash Fill shortcut key
One of the reasons why Excel is popular among its users is because of its shortcut keys. Excel provides shortcut key keys for almost every operation. Those who quickly want to access Flash Fill without using a mouse can run it directly from the keyboard using the shortcut keys: Ctrl + E.
Steps to implement Flash Fill in Excel
Whenever Excel comes across any type of pattern, it automatically suggests the output using the Flash Fill tool. Therefore to implement this tool, the user only needs to provide a pattern.
- Insert three columns in your Excel worksheet. The first column should include the First name, in the next mention Last name, and the third one mention Full name.

- In the third column, we will combine the first name and last name. Manually type in the output for the first two cells as shown below.

- Select the cells, Go to Data-> Data Tools -> Flash Fill, and if Excel senses a pattern, it will automatically fill the data for the other entries.
How to apply Flash Fill using shortcut
In most conditions, Flash Fill fits in automatically as soon as Excel verifies the data in the form of some pattern. If, due to any reason, the suggestion or the preview does not appear, you can apply the Flash Fill tool manually by following the below steps:
- Enter the data in the first cell and press Enter. Repeat the same for the second cell.

- Press the Flash Fill shortcut keys from your keyboard, i.e., Ctrl + E. All the data values will be automatically filled in down the column.

Excel Flash Fill options
Flash Fill is a very versatile tool that allows the user to automate their data entry in Excel. The Flash Fill Options button is displayed next to the auto-filled cells. Clicking on the options menu button will open the following window:
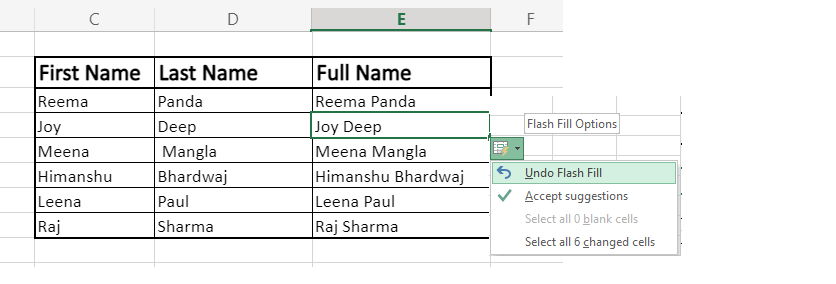
- Undo the output of Flash Fill.
- Select blank cells whose values are not filled by the Flash Fill tool.
- Select the formatted cells, for instance, to change the formatting of all cells at once.
Excel Flash Fill examples
While working in Excel, you often need to format the data, such as pin code, phone numbers, country code, etc. You may also want to remove the leading or trailing spaces between your content or the improper use of punctuation in your content. If you work manually, it could take long hours to fix all these errors, and still, there are chances of errors, whereas the same task can be accomplished in a blink of time with the help of Flash Fill.
Let’s understand the capabilities of this versatile tool through some real-life examples:
1. Extract text from cell (split columns)
Extracting content from Excel data is one of the basic operations carried out by millions of Excel users daily. Before Flash Fill came into the picture, users needed to do complicated text manipulation or even intricate VBA coding.
For example:
- Suppose you have a given set of data and you want to extract the year of birth of every candidate in a separate column.
- To achieve the expected, manually type in the year of birth in your column’s first and second cell (in some cases, you may require to type in the third cell as well).
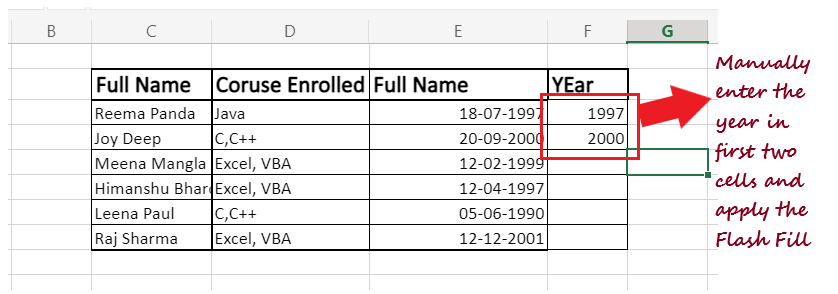
- It will help Excel to recognize the pattern, and it will show you the suggestions. Press the Enter button on your keyboard. Or you may also go to Data-> Flash Fill as soon as Excel understands what you are trying to do; it fills in all the rows below the example with the extracted birth year.

NOTE: Flash Fill is used to extract any substring, numbers from string, zip codes, or even allows the user to split cells in Excel.
2. Concatenate data from different cells
Flash Fill allows the user to concatenate the data in an Excel spreadsheet. Earlier, without Flash fill, it was a lengthy process as the user needed to apply the formula first to concatenate and then format it with proper punctuation.
For Example:
In the below spreadsheet, we need to combine the first name, middle name, and last name to a new column.

It can combine two cells that can further be separated with characters such as space, comma, semicolon, etc., Type in the value in the first two cells and apply the flash fill.

After implementing Flash Fill, all the cells will be automatically filled and will have the following output.

3. Clean data
Maybe you are working with Excel worksheets that are extracted from a database or other data source platforms. The data extracted comes along with unfinished formattings, such as it could contain leading space or undefined punctuations.
For example, in the below spreadsheet, we have undefined characters and leading and trailing spaces in our data.

Type the first name without any preceding space, repeat the same for the second cell and apply the Flash Fill. You will get the following output.

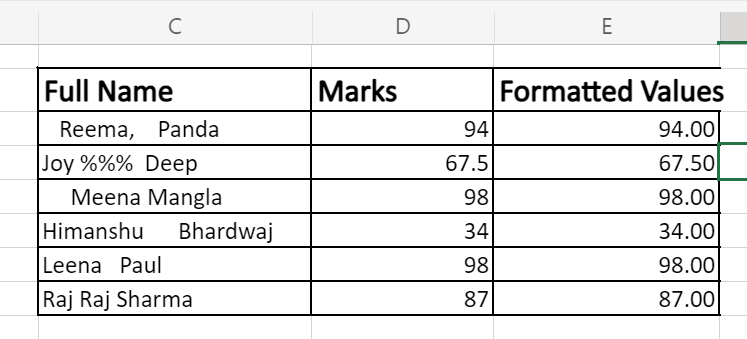
4. Format text, numbers and dates
Formatting your Excel spreadsheet is necessary as it makes your data look clean and make it more readable. Sometimes while working with Excel your data is formatted in some style while you want it in another. In the new column type the first two values exactly as you want them to look like , and apply the Flash Fill.
Limitation of Flash Fill
Undoubtedly, Flash Fill is a special tool, but it too has some restrictions. Below given are some limitations of this tool:
- The Output of Flash Fill is static.
Flash Fill results are static, which means they do not update automatically. Therefore, unlike Excel formulas, it won’t affect the Flash Fill result if you make any modifications to the original data. - Flash Fill may fail to recognize a pattern or may give the wrong output.
In some cases, Flash Fill may not deliver the expected output. It happens mostly when your data is organized or formatted differently. - Skips the cells that contain non-printable characters.
If some cells of your original data contain spaces or other non-printable characters, Flash Fill ignores those cells. - It converts the numbers to alphanumeric strings.
While using Flash Fill for numbers, please note that this tool converts your numbers to string values.
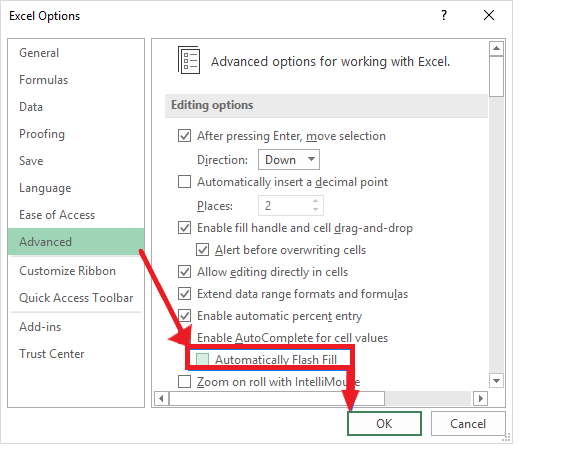
How to turn off Flash Fill
Though by default Excel automatically turns on the Flash Fill feature. But sometimes, the automatic suggestion or the preview could be disturbing, or the user doesn’t want the data to be filled automatically. In that case, they can turn off or disable the Flash Fill tool from their Excel worksheet. Follow the below steps:
- Open your Excel worksheet; from the ribbon bar, click on File> Options.
- From the left panel, go to Advanced.
- Scroll down and look for Editing options. Untick the Automatically Flash Fill box. Click on OK.