
Sheet Options in Excel
MS Excel or Microsoft Excel is currently the most powerful spreadsheet software developed by Microsoft. It allows us to organize vast amounts of data across multiple sheets. Every Excel workbook has at least one sheet. By default, when we create a new Excel file, it usually has three sheets, namely Sheet1, Sheet2, and Sheet3. Furthermore, we can add or delete the desired number of sheets accordingly.
In this article, we are discussing the various Sheet Options present in Excel. But, before understanding the sheet options, let us first take a brief introduction of the sheet with the help of its definition.
What is a Sheet in Excel?
An Excel sheet, also called a worksheet, is a single page or a document in an Excel workbook with the collection of cells to help us organize the data. Based on requirements, an Excel workbook can have many sheets. The sheets are typically listed as tabs and are accessed from the bottom of the Excel window.
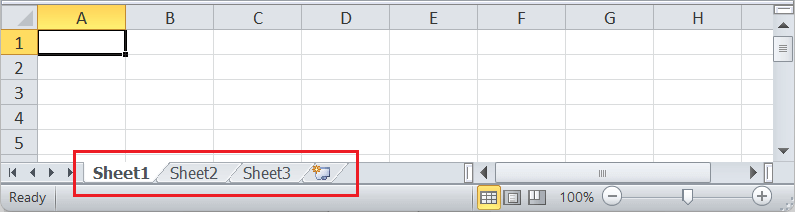
In the above image, the default Excel sheets are present on the Sheet Toolbar. We can switch between the sheets by clicking on the sheet’s name that we want to view. Also, there are many things or tasks that we can perform with Excel sheets. All the corresponding features of the sheet are accessed using the Sheet Options in Excel.
What are the sheet options in Excel?
Since an Excel sheet is one of the core elements of the workbook, there are multiple core options to perform from the Sheet Options. We can access various sheet options by using the following ways:
- Ribbon Sheet Options
- Right-click Sheet Options
Let us discuss each in detail:
Ribbon Sheet Options
Excel has all the basic and advanced options present on its ribbon. Likewise, some quick sheet options are also present on the Excel ribbon and can be accessed by going to Page Layout > Sheet Options. It mainly has four toggle options: two for Gridlines and two for Headings, and they can be turned on and off by selecting and deselecting the checkboxes.
- Gridlines:
- View: This option allows users to show/ hide gridlines within the active worksheet. Turning off this option removes the gridlines from the sheet and displays a blank Excel sheet.
- Print: This option allows users to show/ hide gridlines on an Excel document that will be printed on paper.
- Headings:
- View: This option allows users to show/ hide headings within the active worksheet. Turning off this option removes the headings from the current sheet’s headers and footers.
- Print: This option allows users to show/ hide headings on an Excel document, which is to be printed on paper.
The above sheet options are worksheet-specific, and changes are only applied to the active worksheet. This means that we have to adjust these options again for the new worksheets and workbooks.

In the above image, we also see the small box with an arrow icon on the corner of the Sheet Options group. It is usually called the ‘More’ button for accessing advanced options for the corresponding group or category.
Sheet Options in Dialogue Box under Page Setup
After clicking on the ‘More’ option (the arrow icon on the corner of the Sheet Options group on the ribbon), we get various sheet options. These sheet options are mainly used to adjust preferences for printing purposes. For instance, when we print Excel documents, gridlines are not usually printed. We can adjust preferences from sheet options to include the gridlines to print and manage other sheet options.

- Print Area: We can select the print area using this option. We can drag and select the area or range of cells by using the mouse.
- Print Titles:
- Rows to repeat at top: This option helps us select the title to display at the top for corresponding rows.
- Columns to repeat at left: This option helps us select the title to display on the left side for columns.
- Print:
- Gridlines: This option can be enabled or disabled by selecting/ deselecting the checkbox. It helps us decide whether to show gridlines or not on printed Excel documents.
- Black & White: Like the gridlines, we can select this checkbox to print the current Excel document in black and white color, even if we have the color printer attached.
- Draft Quality: Selecting the checkbox associated with the draft quality allows us to print the Excel document using the printer’s draft-quality settings.
- Rows & Column Heading: We can select this option to display rows and columns headings to the printed Excel documents.
- Page Order:
- Down, then Over: This option allows users to print the down page first and then the right pages.
- Over, then Down: This option allows users to print the right pages first and then the down pages.
- Print: Clicking on this option gives a command to the device to print the current Excel document using the default printer.
- Print Preview: This option displays the preview of the Excel document that will be printed on paper.
- Options: This option allows users to choose layout type (portrait or landscape) and paper mode (A4, A5, etc.) for the Excel document to be printed.
Right-click Sheet Options
In Excel, the right-click with mouse button usually displays the context menu for the selected element. When we press the right-click on any Sheet tabs, Excel displays a list of options relevant to Excel sheets. The list includes various sheet options. However, this list is usually called the ‘worksheet menu’.
The right-click sheet options are shown in the following image:
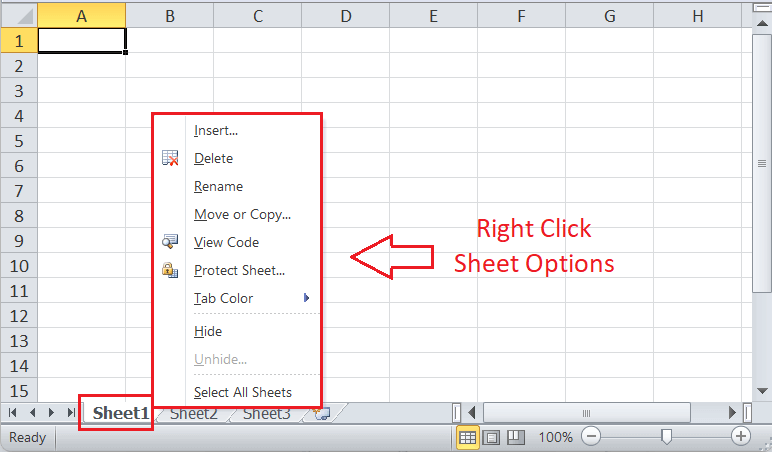
In the above image, we can see various sheet options. Let us understand the use of each option in detail:
Insert
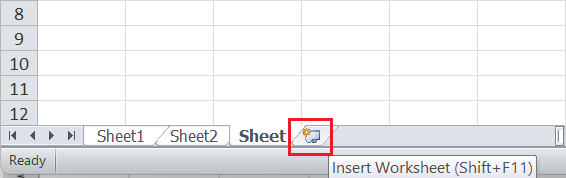
While working on Excel, we may sometimes need more sheets. For this, we need to go to the Sheet options by right-clicking the worksheet name on the sheet tab, then select Insert from the list. As soon as we click the Insert, the new blank worksheet will appear in the current workbook.
We can also use the New Sheet button (Plus button next to sheet tabs) to add a new worksheet instantly.
We can also change the default number of worksheets to be added to each new workbook. For this, we need to go to File > Excel options > General > Include this many sheets.

Delete
Excel also allows us to delete the undesired sheets from the workbooks. For instance, suppose that we only want to organize our data in a single sheet, then deleting the remaining sheets will give a professional and clean look to our workbook.
To delete any desired sheet from the workbook, we must first press the right-click on a specific sheet on the sheet tabs and then select the Delete option from the list of sheet options.
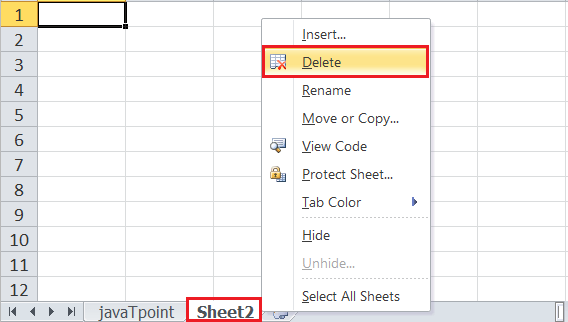
As soon as we click the Delete button, the corresponding sheet is instantly deleted from our workbook.

Rename
Whenever we create a new Excel workbook, we usually get three excel sheets with default names, Sheet1, Sheet2, and Sheet3. Also, if we insert a new sheet, Excel follows the same order and inserts new sheets with names like Sheet4, Sheet5, etc. However, we can rename any worksheet and change the default sheet name to any desired name to better reflect its content.
To rename the worksheet, we can use the Rename from the sheet options after right-clicking on the desired sheet name on the sheet tab. After that, we need to enter the desired name for the specific worksheet and click the Enter key. The worksheet will be renamed instantly.

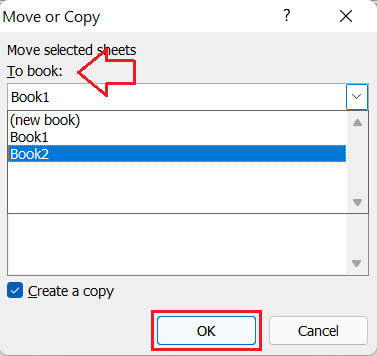
Move or Copy
When we need to duplicate the data from one sheet to another in Excel, we can use the Move and Copy option from the right-click sheet options list. We must first right-click on the sheet that we wish to copy and then select the ‘Move and Copy’ option.

After that, Excel will display a Move and Copy dialogue box, where we need to select the desired preferences. For instance, we can choose where to place or copy the sheet contents under the ‘Before sheet’ option. If we want to place a sheet’s content to the right of the last worksheet (or to a new sheet), we can click the ‘Move to End’ option from the list.
Lastly, we can click the checkbox next to the ‘Create a copy’ option to duplicate the content without deleting the original content. If we don’t select the checkbox, then the original content from the selected sheet will be deleted or moved to the desired location. The copied sheet will keep the title, version number, and other details from the source content.

In this way, we can create a copy of the desired sheet or move the content into another sheet. Excel also allows us to copy the sheet content to an entirely different workbook. For this, we must select another workbook (should be open already) from the drop-down list under the ‘To book’ option.
Sometimes, we may need to move any specific sheet across the sheet tabs to rearrange the workbook. Excel allows us to do this using the mouse. To move a sheet, we must first select the specific sheet, click and hold it until we see a small black arrow across the sheet tab.
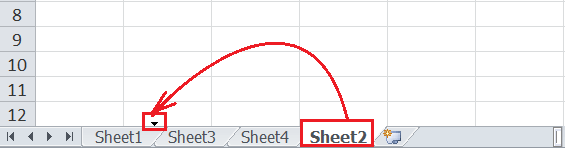
We can place our cursor to the desired location over the sheet tab and release the mouse button to drop the selected sheet.

View Code
We can launch VB (Visual Basic) Editor by going to any sheet tab, right-clicking ad choosing the option ‘View Code’. However, this option is rarely used to launch VB Editor.
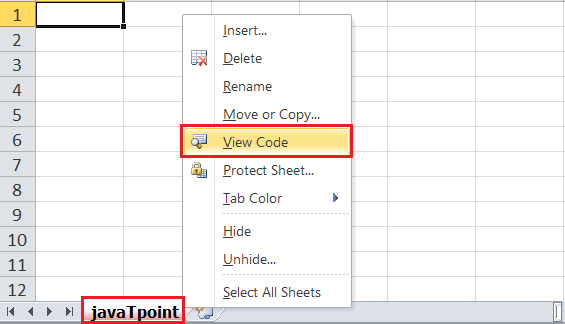
If we launch VB Editor using the ‘View Code’ option on any sheet tab, Excel will open a code window for that specific sheet. Therefore, this option to launch VB Editor is mainly useful when writing code that will work only for a particular sheet. For example, creating worksheet events.
Protect Sheet
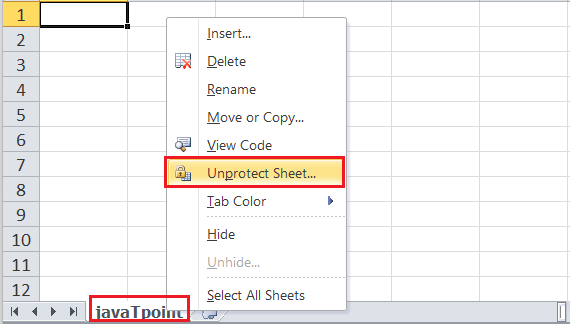
If we protect any desired sheet within the workbook, Excel restricts users from editing or deleting the specific sheet. To protect any particular sheet in an Excel workbook, we need to right-click on the desired sheet and select the ‘Protect Sheet’ option.
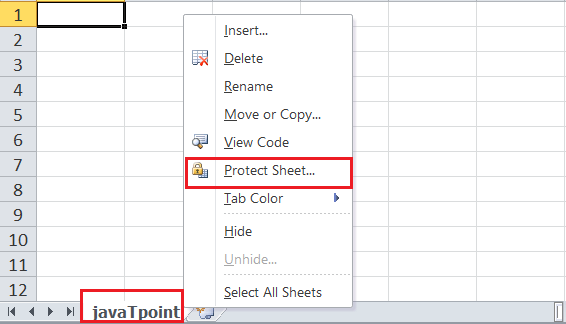
After clicking the protect sheet, Excel will display another window to set preferences for locking purposes. Additionally, we can set a password that will restrict others from unlocking or unprotecting the sheet.
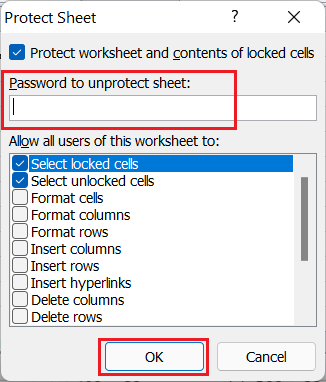
If anyone wants to unprotect the sheet, he must enter the correct password after clicking the Unprotect Sheet option.
Tab Color
The sheet tabs can be colored with the desired color. We can change the default sheet tab’s color by using this option. Using any specific color on any particular sheet’s tab helps us easily navigate to that sheet among various worksheets.
To change the color of the sheet’s tab, we need to select the Tab Color option from the list that we get after right-clicking on the sheet’s tab. Next, we must click on the desired color, and it will be immediately applied to the selected sheet tab.

Excel also displays a preview of the tab color when we hover the mouse on any specific color. The tab color is considerably less visible if the same sheet is active. However, selecting the other sheet highlights the tab color and makes it easily searchable.

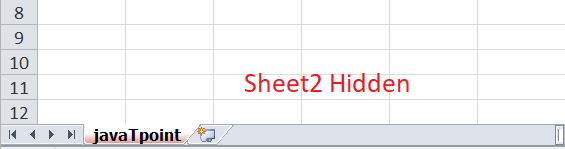
Hide
By default, Excel displays all the sheets of the workbook son the sheet tab. We can view or access any sheet from the sheet tabs. However, there may be cases when we don’t want to show any specific sheet to others, but it has important data in context to other sheets. It is good to hide the specific sheet in such a case, and there will be no effect on the referencing data.

To hide a sheet, we need to click on the Hide option from the list of right-click sheet options. As soon as we click the Hide option, the corresponding sheet will no longer be visible on the sheet tabs.
Unhide
Like we hide the sheet in an Excel workbook, we can unhide the sheet in the same way. We need to select the Unhide option from the list of right-click sheet options, and the corresponding sheet will again be visible.

If there are multiple hidden sheets within the workbook, Excel displays a list of all the hidden sheets and asks us to choose desired sheets that we want to unhide.

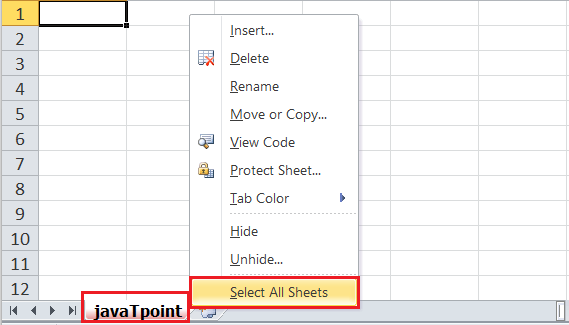
Select All Sheets
If we want to select all the workbook sheets at once, we can click on the ‘Select All Sheets’ option from the list. Once all the sheets are selected, we can perform some specific tasks on all the selected sheets at once.
Additional Sheet Options
Although Excel sheets have many tasks, the grouping, ungrouping of sheets, and switching between sheets are some essential ones that are not present as direct sheet options. We need to use specific methods to perform these tasks, as discussed below:
Grouping worksheets
Excel allows us to group multiple sheets simultaneously. It is helpful when we need to work with multiple sheets at once with some common data. For example, entering candidate names, month names, weeks, etc. Any changes made to one sheet will also be copied to other sheets in the group.
To group multiple sheets in Excel, we must first select any sheet from the sheet tab to include in the worksheet group.

After selecting one sheet, we need to press and hold the Ctrl key on the keyboard. We need to click on the next sheets on sheet tabs that we want to include within the group. Once all the sheets we want to group are selected, we must release the Ctrl key, which will group all the sheets.
Although we can navigate to any sheet within the created group and make changes accordingly, we must not select the sheet that is not in the group. If we do this, all the sheets will be ungrouped automatically.
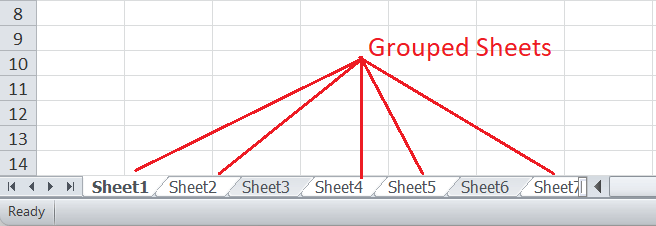
Ungrouping Worksheets
When we have multiple sheets grouped in the workbook and wish to ungroup them, we need to right-click on any of the sheets in the group. This will open sheet options, as shown below:

We must select the ‘Ungroup Sheets’ option to ungroup sheets in the above image workbook. This method is mainly used when we have so many sheets grouped in the workbook that we cannot easily find a sheet that is not part of the group. Generally, we can click any sheet that is not part of the group, and all the sheets will be ungrouped.
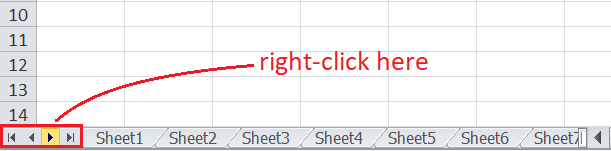
Switching between Worksheets
When we need to view different sheets from the sheet tab, we usually click on the desired sheet name using the mouse. However, when the workbook has so many sheets, it becomes difficult to scroll through sheet tabs to find and click on them to switch to the desired sheet. In such a case, we need to press the right-click button on the scroll arrows in the lower-left corner of the Excel window, as displayed in the image below:
Excel displays a list that has all the sheets of the current workbook. We can easily select the desired sheet from the list to view its content instantly.
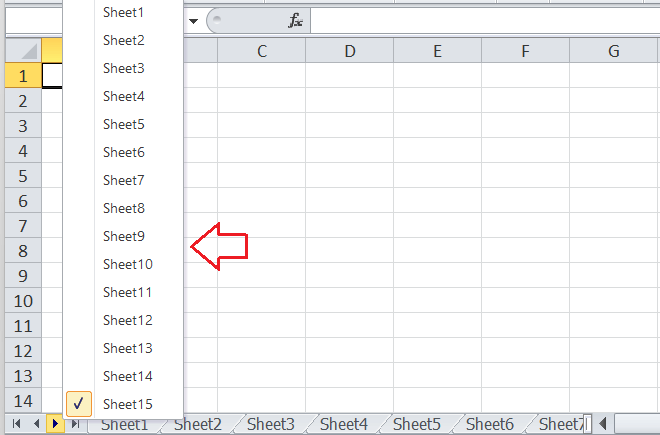
In this way, we can easily switch between Excel worksheets without using the sheet tabs.


