
Nested If Function in Excel
The nested IF formula is widely used to implement decision-making logic in almost all programming languages. The same is applied in Excel worksheets as well. IF functions are applied whenever the user wants to test a condition, and it returns true if the condition is met and False if the condition is not met. When the user wants to apply more than one condition and return different logical values based on their output, they opt for multiple IF functions inside each other.
Although Nested IF statements are very common, they are not the only way to implement decision-making logic in the Excel worksheet. There are various other alternative methods as well.
In this tutorial, we will cover Nested IF, how to implement them in Excel to check multiple conditions, tips and tricks to use Nested IF.
Excel nested IF statement
“Nesting” is defined as the method of combining multiple functions in one formula.
The IF function enables the user to perform a logical comparison by testing for a condition, and if the condition is met, it will return TRUE; else it will return False.
When two or more IF statements combine and form one single formula, this is known as nested IF statements.
NOTE: Excel permits to nest up to 64 different IF statements.
Let’s understand the syntax of IF formula before moving to nested IF in Excel:
Syntax of IF
Where,
logical_test (required): This argument represents the condition that an user to test.
value_if_true (required): This parameter represents the value that is returned if the condition is TRUE.
value_if_false (optional): This parameter represents the value that is returned if the condition is False.
Syntax of nested IF
Nested IF- Understanding Logic
In the above syntax, you will notice that each consequent IF statement is inserted into the optional value_if_false parameter of the previous function. Each IF statement starts with parentheses, and the parentheses are closing at the end of the formula.
In our syntax, you will also notice that we have entered 3 logical_conditions, whereas it returns 4 output. The formula returns output4 if none of the conditions is TRUE. Converting the above syntax is a more readable format.
Test logical_condition1, if TRUE - return output1, if FALSE - test logical_condition2, if TRUE - return output2, if FALSE - test logical_condition3, if TRUE - return output3, if FALSE - return output4
The formula instructs Excel to perform the logical_condition1 of the first IF statement, and if the condition is TRUE, it should return the output1 value provided in the value_if_true parameter. If the condition is False, then it should test the 2nd If statement, and so on. If none of the conditions are met, it should finally return output4.
Example to Demonstrate Classic Nested IF Formula
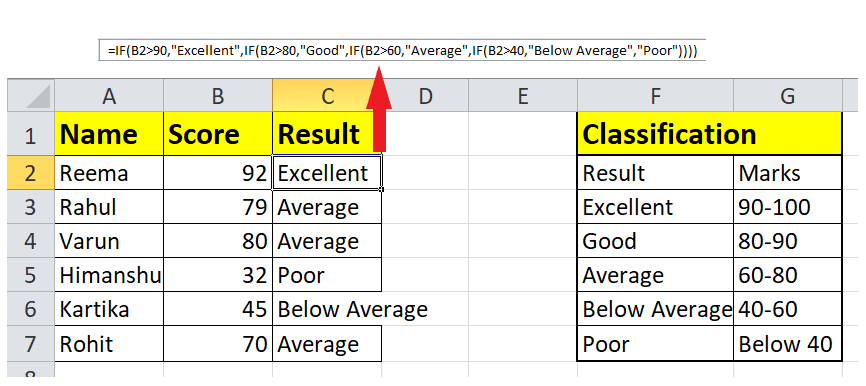
As an example, let’s find out the categorized list of students based on their exam marks. We have the following classification:
| Classification | Marks |
|---|---|
| Excellent | 90-100 |
| Good | 80-90 |
| Average | 60-80 |
| Below Average | 40-60 |
| Poor | Below 40 |
With nested IF statements, it’s essential to arrange the logical conditions in an accurate order, i.e., either high to low or low to high. In the above example, we order the “highest” value first, then the “second highest”, and so on:
Let’s write a nested IF format based on the given classifications. The formula for Excel nested IF statement is as follows:
=IF(B2>90,"Excellent",IF(B2>80,"Good",IF(B2>60,"Average",IF(B2>40,"Below Average","Poor"))))
Follow the below steps to embed the above formula in your Excel worksheet and find the categorization of students based on their exam scores:
- Enter the formula in the C1 cell and press enter. It will show you the output.
- For the next cells, drag the formula to the Fill handle.
- It will automatically copy the formula and change the cell reference for you.
- As shown below, you will have the categorization.
Because of multiple IF statements, conditions, parenthesis, it becomes a bit complex to formulate the logic of a nested IF statement accurately to the end. Although Microsoft Excel enables nesting up to 64 IF statements in a single formula, it is not advised to embed 64 IF statements in your worksheets.
Excel nested IF – tips and tricks
Unlike any other programming language, nested IF in Excel is easy to implement if you know the logic. But following the tips and tricks will help you to prevent mistakes and will help you improve the nested IF formula.
Limitation of nested IF
In the earlier versions of Excel, i.e., Excel 2003 or lower, the user could nest only upto 7 nested IF functions. But it got upgraded in Excel 2007, and the user can nest up to 64 IF statements in a single formula. Though it is not advised to embed 64 IF statements in your worksheets, it would complicate the formula, leading to more errors.
Precisely write the order of nested IF statement
The nested IF function in Excel operates the logical condition in the same order in which they are presented in the formula. If any of the conditions comes out to be TRUE, excel stops the formula, and further logical conditions are not tested. Therefore, the order of your logical statements is very crucial.
Let’s understand the above statement using an example. Below given is a nested IF statement where B2 = 78. It will check the first statement 78>90, return false, and move to the next statement. Again it will check 78 > 80, and it will return False. Furthermore, in the next condition, 78>60, it returns true. The formula will terminate here, and the output will be Average.
=IF(B2>90,"Excellent",IF(B2>80,"Good",IF(B2>60,"Average",IF(B2>40,"Below Average", "Poor"))))
Now if you reverse the order of IF functions:
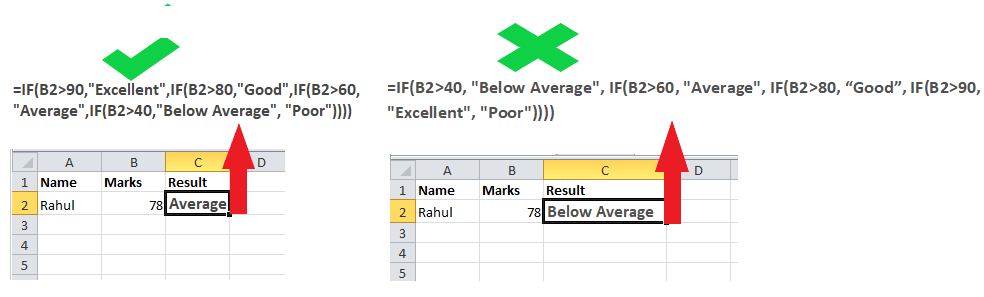
Excel will test the first condition in the formula, and because 78 > 40, it will return TRUE. Furthermore, the formula will return “Below Average” without testing other logical conditions.
Evaluate the formula logic
To observe the logical progression of your nested IF statements step-by-step, utilize Excel’s Evaluate Formula feature placed on the Formula tab in the Formula Auditing group.
Close the parenthesis of nested IF statements
While working with nested IFs in Excel, users mostly open the parenthesis and forget to close it. If the pair of the parentheses are not balanced, your formula will show an error. Fortunately, Microsoft Excel presents several features that help the users to match the parentheses when building a formula
If you have two or more parentheses in your formula, the parenthesis pairs are shaded in different colors. The opening parenthesis has the same color as that of the closing one.
Treat text and numbers differently
While building logical conditions, users often treat text and numbers in the same context and often end up with an incorrect formula.
For example, some users mistakenly put double-quotes for numbers as well
The above formula will return a False output because here, 45 is representing a string value.
Always remember that text and numbers are presented differently in Excel. Text is always enclosed in double quotes, while numbers are written without any quotes around them.
Make nested IF formulas readable by adding spaces or line breaks to it.
While formulating nested IF formulas with multiple IF statements, make sure to have proper spacing or line breaks between the two IF statements, so you clearly distinguish between them. Excel doesn’t restrict the user with extra spacing in a formula.
Note: To use a line break in an Excel formula, place your cursor to the position where you want to insert a line break, and press the shortcut key Alt + Enter.


