
Excel Sum Shortcut
MS Excel or Microsoft Excel is one of the most powerful spreadsheet programs. It has a wide range of built-in functions and formulas, and one such function is the SUM. Using the SUM function, we can quickly add or sum up values in an excel sheet. This function is used more frequently than other functions, and hence Excel provides quick shortcuts to use this particular function.

This article discusses essential Excel SUM shortcuts that automatically create a SUM formula for a desired or selected range of data and instantly provide the quick sum of data. Excel SUM shortcuts are usually referred to as AutoSUM shortcuts. They help speed up our work process and save a lot of time while dealing with huge data.
AutoSUM/ SUM Shortcut in Excel
Excel has an extensive range of shortcuts for most of the basic and advanced tasks. Similarly, it allows us two different ways or shortcuts to quickly perform the sum of values within our Excel sheet. We can use any of the following SUM shortcuts in Excel:
- AutoSUM Keyboard Shortcut Key
- AutoSUM shortcut under Home Tab
Let us now discuss each Excel SUM shortcut in detail:
AutoSUM in Excel using the Keyboard Shortcut Key
The AutoSUM shortcut in Excel involves using the Alt key with the equal (=) key, such as “Alt + =”, without the quotes. We must press both the keys simultaneously to quickly sum up selected rows or columns. However, there can be different ways of using this particular keyboard shortcut. As soon as we press the shortcut key, the sum function is automatically applied, and the result is given for the selected range of data.

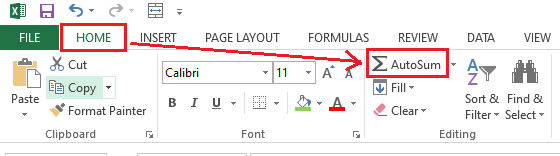
AutoSUM in Excel using the AutoSUM shortcut under Home Tab
Another shortcut to quickly sum up values in Excel is located on the ribbon. We need to go to the Home tab and select the ‘Auto Sum’ icon from the Editing group. We can also access this shortcut using the keyboard. For this, we must press the Alt key followed by H, U, and S, i.e., Alt + H + U +S. Once we click the ‘Auto Sum’ tool shortcut, the SUM function is applied, and the result is provided just like the previous shortcut.
Steps to Use AutoSUM shortcut in Excel
Although both the shortcuts are convenient, the keyboard shortcut is way better than the other one. We need to follow the below steps to use the AutoSUM keyboard shortcut in Excel:
- First, we must place the cursor below the selected cells of the column that we want to sum. Similarly, we can also place the cursor to the outer-left of the row after the data range that we want to sum.
- Next, we need to press and hold down the Alt key. Upon holding an Alt key, we also need to press the equal (=) sign button on the keyboard.
- Lastly, we must press Enter button.
That is how we can use the AutoSUM keyboard shortcut in Excel to get the quick sum of the desired values in a worksheet. Alternately, we can use the AutoSUM shortcut from the Home tab after selecting the desired cells. It works similar to the SUM keyboard shortcut.
Different Methods to Use Excel AutoSUM Shortcut
Since Excel allows us to enter data into the sheet differently, we may need to add values accordingly. Specifically, we use rows and columns to store data. Therefore, we may have to sum up the values of the rows and columns as desired. Furthermore, we may also need to add values to a single row/column or multiple rows/columns depending on how the data is stored in a sheet.
Let us understand the different ways that we can use the Excel SUM shortcut and sum up values in Excel:
AutoSUM Single Column and Row
Performing the SUM in a single row or column is quite easy with shortcuts. When we use the SUM shortcut in any column, it is called vertical sum, and the result is given in a cell below the data range of that particular column. Besides, when we use the SUM shortcut in any row, it is called horizontal sum, and the result is given in a cell beside the data range (outer right cell) of that particular row.
Let us discuss both with an example:
AutoSUM into a Below Cell (Vertical AutoSUM)
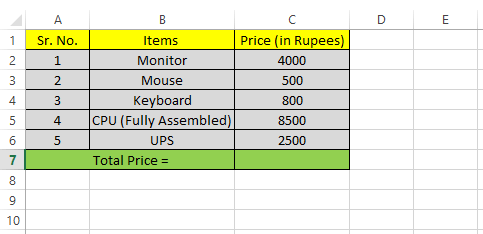
Suppose we the following data set where we want to sum up the values of column C using the SUM shortcut.
We need to follow the below steps:
- First, we need to select any empty cell below the values/ data in column C. Selecting the immediate cell below the last cell of the data range is not compulsory if the mid cells are empty. However, it looks more organized when selecting a cell just below the data. Therefore, we select cell C7.
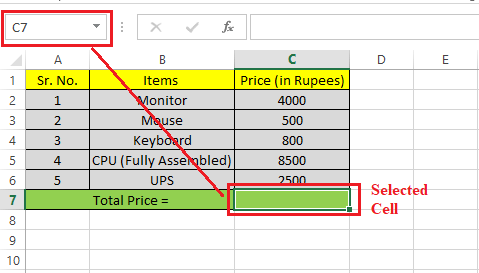
- After selecting the cell below the data range, we need to use any of the convenient SUM shortcuts discussed above. We use the keyboard shortcut Alt + =. As soon as we use the shortcut, Excel immediately displays the SUM function in a selected cell combining all the cells in a column.

- Lastly, we must press the Enter button on the keyboard. In the below image, all the values of column C are added in cell C7.

That is how we can quickly sum up values in a column using the Excel SUM shortcut on the keyboard.
AutoSUM into a Beside Cell (Horizontal AutoSUM)
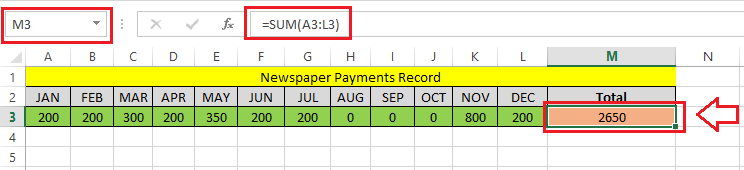
Suppose we the following data set where we want to sum up the values of the 3rd row using the SUM shortcut.

We need to follow the below steps:
- First, we need to select any empty cell next to the data range of the 3rd row. Selecting the immediate cell after the last cell of the data range is not compulsory if the mid cells are empty. In our case, we select cell M3.

- Once the desired cell to obtain a result is selected, we must use the desired SUM shortcut discussed above. We use the keyboard shortcut Alt + = for quick results. After using the shortcut, Excel immediately displays the SUM function in a selected cell combining all the cells in a row.

- Lastly, we must press the Enter button on the keyboard. In the below image, all the values of the 3rd row are added in a selected cell M3.
That is how we can quickly sum up values in a row using the Excel SUM shortcut on the keyboard.
Note: If there is a text in any cell of the selected range of row or column, we must select all the cells that we want to sum and then only use the SUM shortcut.
AutoSUM Multiple Columns and Rows
Sometimes, we may need to add values of multiple columns or rows instead of a single column or row. In such cases, it will take time to use the SUM shortcut for each row or column repeatedly. Instead, we can use the shortcut once and sum up values of multiple columns or rows instantly.
Let us discuss both the scenarios (adding multiple columns and rows) with an example:
AutoSUM into Cells below Data Cells (AutoSUM Multiple Columns)
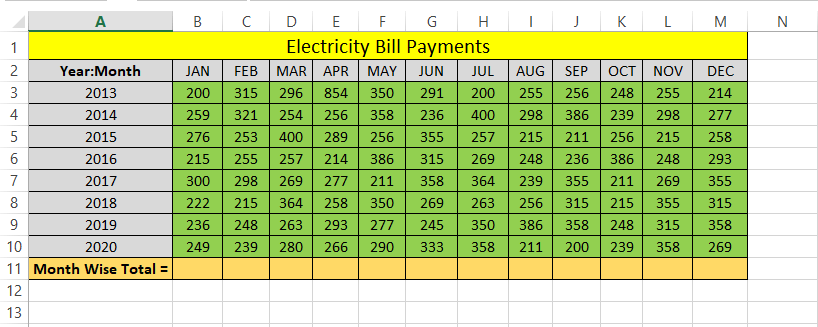
Suppose we have the data set with values in more than one column, and we need to add their values immediately using the SUM shortcut. In other words, we need to calculate month-wise total bill payments in the following Excel sheet:
We need to follow the below steps:
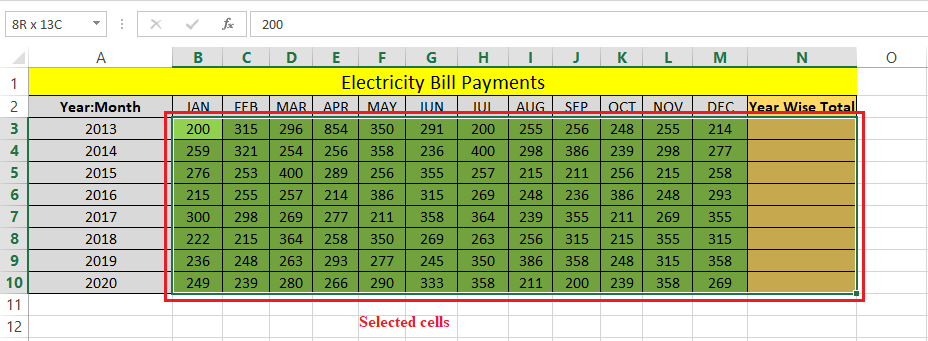
- First, we need to select all the cells that are present just below the data set. In our case, we need to select cells from B11 to M11. These are the result cells in our sheet.

- After selecting the result cells, we must use any of the SUM shortcuts. We use the shortcut “Alt + =” to get quick results. Once we press the shortcut keys, Excel will instantly display the SUM values in all selected cells.

- Once the formula has been applied to selected cells, we can double-click or select any specific result cell to check the formula applied to it. Also, we can ensure that whether all the values are covered within the SUM formula for that particular column.

This way, we can get the SUM/ total of values for multiple columns at once.
AutoSUM into Cells beside Data Cells (AutoSUM Multiple Rows)
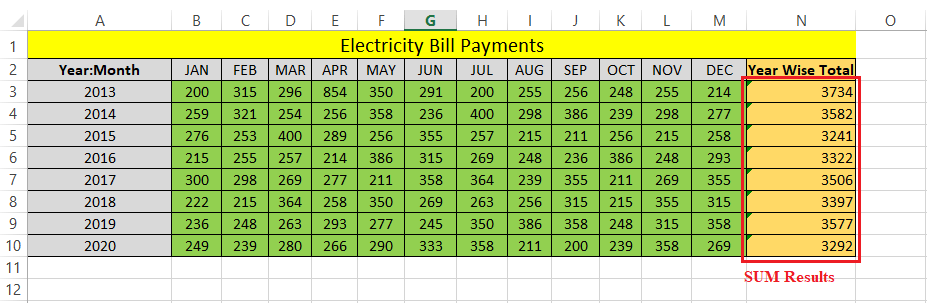
Let us now take the above example with another scenario. Now, we need to sum up values present in rows. In other words, we need to add values of cells in rows and find the year wise total payments in the following sheet:

We need to follow the below steps:
- First, we must select all the cells with the necessary values in rows, including the result cells.
Unlike the previous method, we cannot only select result cells in this scenario because it includes all the cells of the rows. Since we have numerical values in column A, Excel will also add them with the other cells of the row when selecting only the result cells.
We can select the result cells if there are no undesired numerical values present in rows. - After selecting the data range with result cells, we must press the “Alt + =” shortcut key. As soon as we press the shortcut, Excel instantly displays the desired results in all the results cells present beside data cells.
- We can double-click any result cell and check the formula applied to it.

Thus we can get the total sum for the values present in the cells in multiple rows at once.
Limitation of Excel AutoSUM Shortcut
Excel SUM shortcuts have some limitations. One of the main limitations of using the SUM shortcut is that it takes all the above cells until it locates the blank cell.
Suppose we have the values in column A from cell A1 to cell A8. However, there is also a blank cell (cell A4) within the range from A1 to A8. It looks like this:
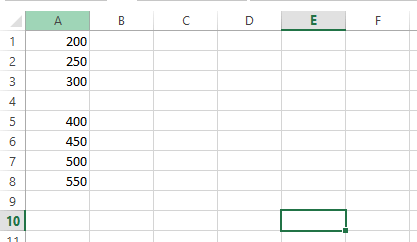
If we use the SUM shortcut “Alt + =” in any of the cells below the data range, we will get the wrong results. Since there is a blank cell, Excel ignores all cells above the blank cell and returns the result by adding only the cells below the blank cell or the selected cells.
When we use the shortcut Alt + = in a cell A9, we get the following result:

In the above image, we can see that Excel only adds values below the blank cell. However, we can select all the cells and get the desired result by using the SUM shortcut. But, this is not always possible. Especially, we have to use manual methods while working with big data or be careful while using shortcuts.


